How to Edit YouTube Videos: Best Tips, Tools & Workflow

Use Movavi Video Editor!

  • NEW: Adjustable video templates for any vibe – made of Blocks

  • NEW: Blocks – pre-edited video segments you can customize

  • Fast and easy editing: cut, crop, adjust colors and speed

  • Auto subtitles, noise removal, hundreds of effects, and more

By clicking the download button, you're downloading a trial version of the program.*

Edited by
Ben Jacklin
14,725

This guide shows how to edit YouTube videos where the main footage is a screen recording, gameplay, or a webcam. The short answer: pick a screen recorder and video editor that work as a pair, cut the pauses first, add zoom and callouts where viewers need to look, clean the voice, add subtitles, and export an MP4. Below you'll find the YouTube editing tools, the step-by-step order, the YouTube editing tips, and a pre-upload checklist.

It's written for creators who review art, history, or movies on camera, for teachers and students who put tutorials on YouTube, and for gamers and tech bloggers who talk over gameplay or recommend apps. Beginners and intermediate YouTubers who want the same result in less time are in the right place too.

Movavi Video Editor is an intuitive video editor with customizable video templates, one-click AI tools, and hundreds of drag-and-drop effects. It's a desktop app for Windows and macOS, so long recordings stay on your own computer. Drag an effect onto the timeline, and hover previews show a clip, an effect, or a frame before you commit, so your time goes into creating instead of hunting for buttons. Every channel also needs an opening and a closing. Movavi Video Templates is a multi-style library of customizable, pro-looking, modular templates for any kind of video. Each one is built from Blocks, short pre-edited segments where you drop in your own clips, photos, and text.

YouTube editing tools you need

A video built on your screen needs three things: a recorder, an editor, and a microphone. Movavi Video Suite is a 3-in-1 bundle of Movavi Video Editor, Movavi Video Converter, and Movavi Screen Recorder, so a tutorial or an app review goes from capture to export inside one family of tools.

Movavi Screen Recorder runs on Windows and Mac. It records the full screen or a custom area, with system audio and your voice from a microphone. It puts your webcam in the corner, lets you draw while you record, and marks mouse clicks and keystrokes so viewers can follow along. That makes it the natural first half of tutorial video editing: the raw material arrives already narrated.

It also handles multi-source recording, capturing the screen, the webcam, and audio at once. That covers a talking-head video with slides or a demo running behind you, and screencasts can be recorded in 4K.

A few recorder features save editing time later. Noise reduction works while you record, so the hum is already lower when the file reaches the editor. Real-time drawing puts an arrow or a circle on the screen as you talk, which can replace a callout. The recording scheduler starts and stops a capture at a chosen date and time, so a webinar or a stream records while you're away from the computer.

For recording computer games, use a gameplay recorder. Xbox Game Bar works on Windows 10 and Windows 11, and to start recording a clip, just press the Windows key + Alt + R. OBS Studio is free, open-source software for video recording and live streaming, and it also runs on macOS and Linux. Bring the clip into Movavi Video Editor and edit gameplay for YouTube the same way as any screen recording.

Your video

Record with

Edit with

Why this pairing

Tutorial or program review

Movavi Screen Recorder

Movavi Video Editor

Screen, voice, webcam, and cursor effects arrive in one file

Gameplay with commentary

Xbox Game Bar or OBS Studio

Movavi Video Editor

Movavi Screen Recorder is not made for games

Art, history, music, or app review on webcam

Movavi Screen Recorder

Movavi Video Editor

Webcam goes in during recording or later on an extra track

Talking-head video or screencast cut from text

Descript

Descript

You edit the transcript and the video follows

Quick edit in the browser on Windows

Clipchamp

Clipchamp

Built into Windows 11 and Microsoft 365

Clipchamp and Descript suit different habits. Clipchamp keeps everything in the browser with a simple timeline and basic effects. Descript swaps the timeline for text, so a sentence you delete from the transcript disappears from the video, filler words included.

For tutorials, reviews, and gameplay with commentary, the best video editor for YouTube is the one that does the repetitive cutting for you. Movavi Video Editor does it with silence removal, one-click noise removal, and auto subtitles, which is why the rest of this guide uses it. Movavi software has 70M+ users worldwide, and new releases arrive 25+ times a year, so the toolbox keeps growing.

Which version do you need?

In Movavi Video Editor Free, you can test the tools, including auto subtitles, auto crop, and silence removal, and exports carry a watermark and stop at 60 seconds. The full version has no watermark and no export limits, includes every one-click AI tool without a credit system, and exports up to 4K.

The full version also brings hundreds of built-in effects for every style: transitions, titles, filters, stickers, and copyright-free music. The optional Movavi Effects subscription adds 10,000+ effects and 1,500+ music tracks across themes such as blogs and education, and a starter set of templates is included, while the whole template library is a separate subscription. You can preview effects on your own video before you buy. Flexible plans mean you pay only for what you use: start free, add what the channel needs, and skip the rest.

Learn with Movavi Ideas, then edit along

Movavi Ideas is a free tutorial hub that adds new editing techniques every week. Each idea comes with a step-by-step tutorial that takes less than a minute to follow, and the themes run from vlogs and vertical clips to business videos and memes. Before a new episode, browse the hub for a technique to borrow, then follow it on your own footage. A few minutes there can give a regular series a fresh look.

YouTube editing workflow

Screen recordings run long, sit mostly still, and lean on your voice. So the edit has three jobs: tighten the timing, point the eye, and clear up the sound. Every step below teaches how to edit screen recordings for YouTube.

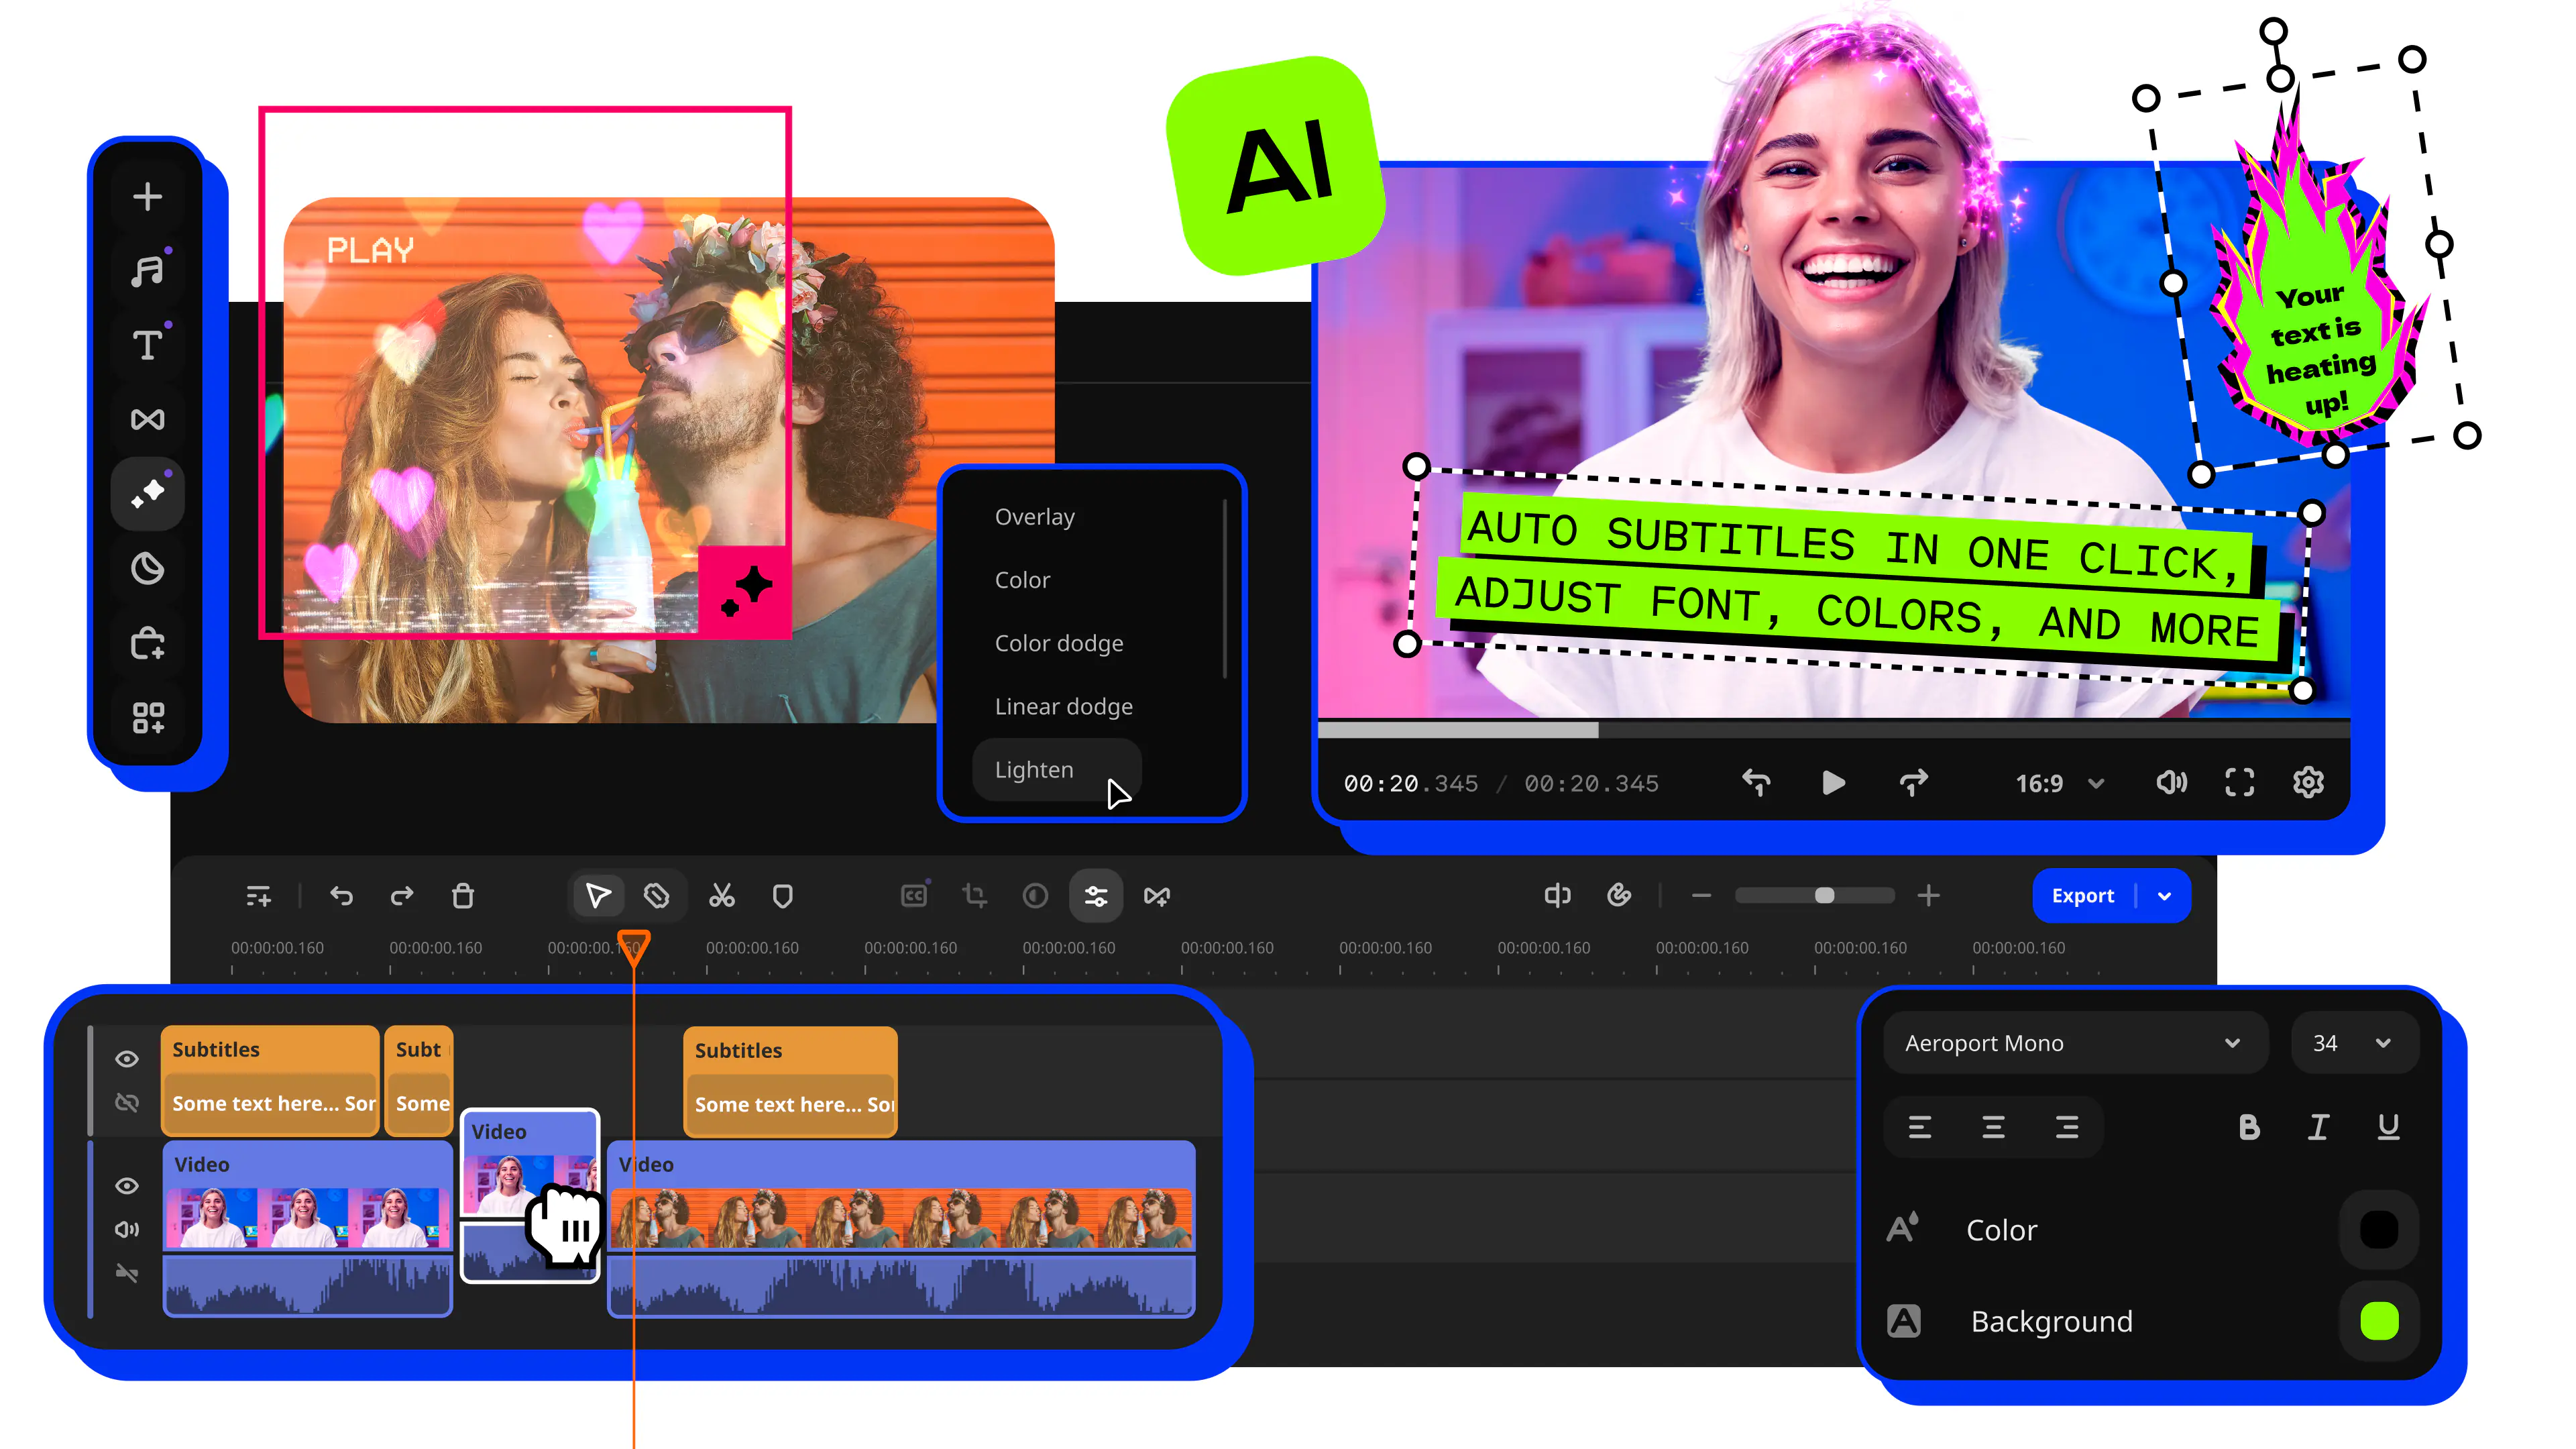
Movavi's AI tools take the hard part in one click: silence removal, AI audio noise removal, and auto subtitles. None of the AI tools runs on credits. Subtitles recognize 100+ languages.

You record first, bring the footage in, set the template, and only then trim and polish. A template arrives with pre-set editing, music, transitions, and text, and you can keep, change, or remove any of it.

1. Record your screen and webcam

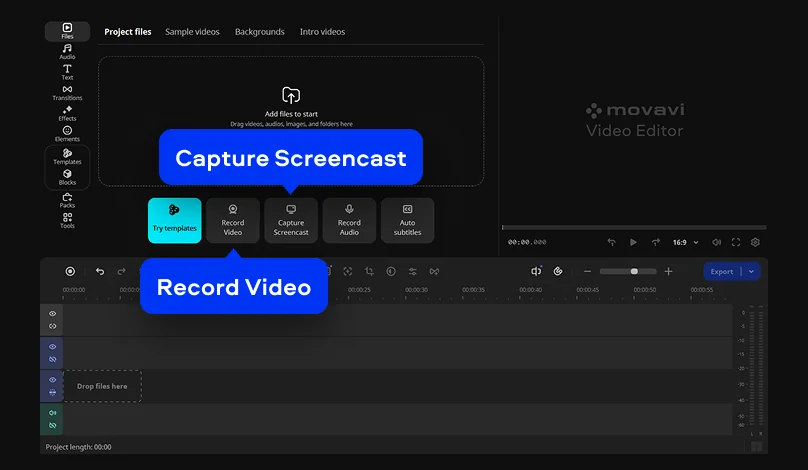
  1. Hit Capture Screencast in Movavi Video Editor and then click the Screen recording icon on the sidebar of Movavi Screen Recorder.
  2. Select the area you want to record.
  3. Open Preferences and go to the Effects tab.
  4. Adjust the cursor settings, then click OK.
  5. Click Webcam and System audio on the recording panel if you want computer sound.
  6. Click REC and walk through your tutorial or review.
  7. Click Stop when you finish.

You can also record your webcam video right in Movavi Video Editor. Click Record Video, specify the settings, and click Start Capture.

2. Cut the pauses and mistakes

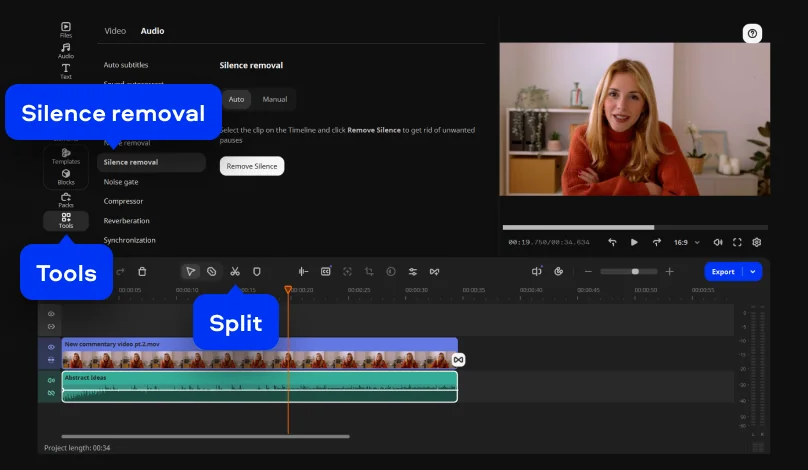
Silence removal reads your audio, flags the stretches that fall under a set volume, and deletes them. Auto mode needs no settings. Manual mode lets you set the volume threshold and the length of the pauses you want gone.

  1. Click your recording on the timeline.
  2. Open Tools > Audio and choose Silence removal.
  3. Choose Auto mode.
  4. Click Remove Silence. Movavi Video Editor detects the pauses, deletes them, and joins the clips without gaps.

To cut out unwanted parts:

  1. Select your recording on the timeline.
  2. Move the position marker to the start of the mistake.
  3. Click the Split button on the toolbar.
  4. Repeat at the end of the mistake.
  5. Select the unwanted piece and click Delete.

3. Add zoom and callouts

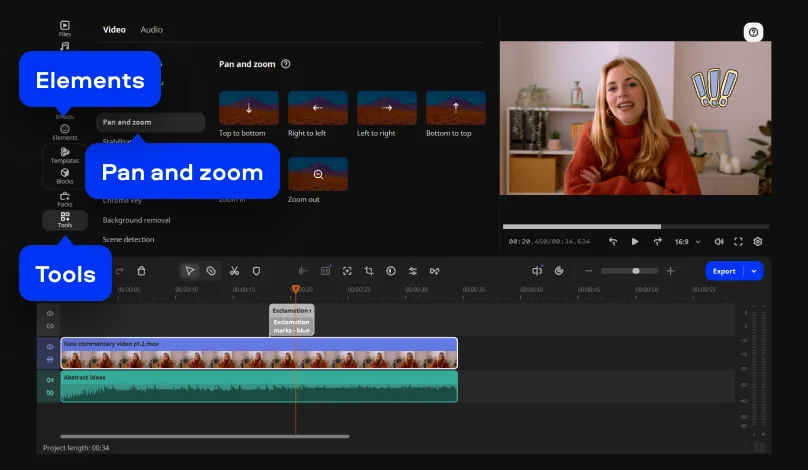
The Pan and zoom tool moves the camera between two keyframes, so a zoom builds smoothly from one frame to the next. Callouts add arrows, icons, and shapes that point at the part of the screen you're explaining.

  1. Select the clip you want to zoom on the timeline.
  2. Click Tools on the left sidebar and select Pan and zoom under Video.
  3. Click one of the presets to apply it.
  4. Click the Elements icon on the left sidebar and open the Callouts tab.
  5. Drag a callout onto the title track of the timeline.

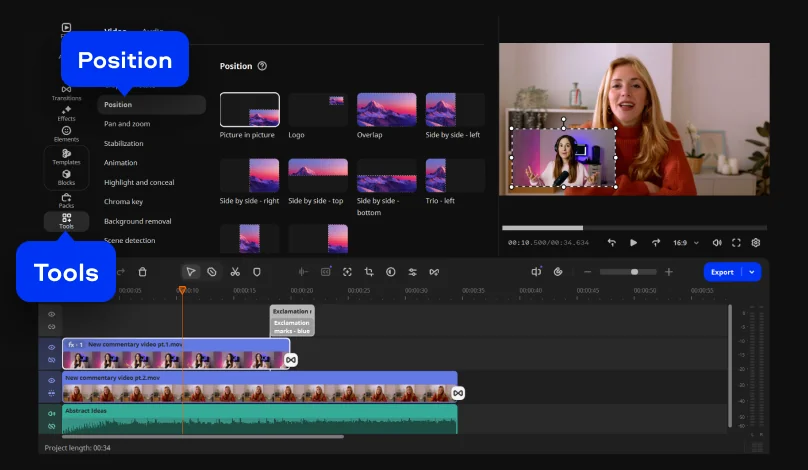
4. Add a webcam overlay

  1. Click Add extra track on the timeline.
  2. Drag the webcam clip onto the extra video track.
  3. Open Tools and choose Position.
  4. Place and resize the webcam picture in the preview.

5. Clean the voice

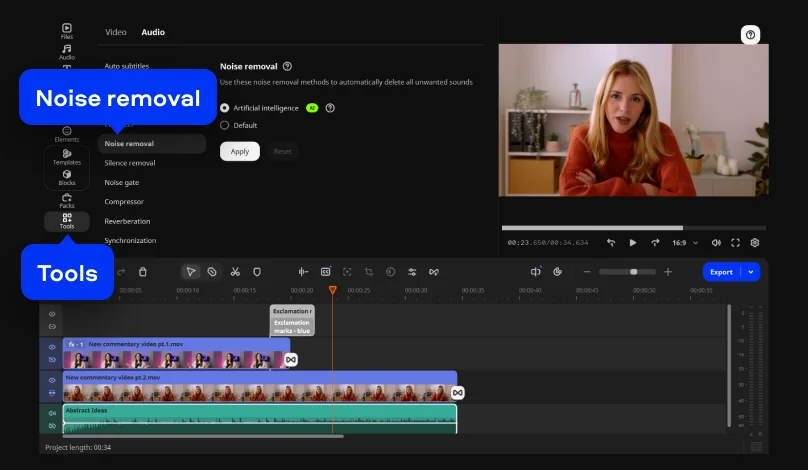
AI audio noise removal clears traffic, wind, and steady hums while keeping your voice sharp. If the voice starts to sound thin or hollow, lower the strength a little and listen again on headphones.

  1. Select the clip on the timeline.
  2. Open Audio in Tools.
  3. Open Noise removal and select the AI option.

6. Add auto subtitles

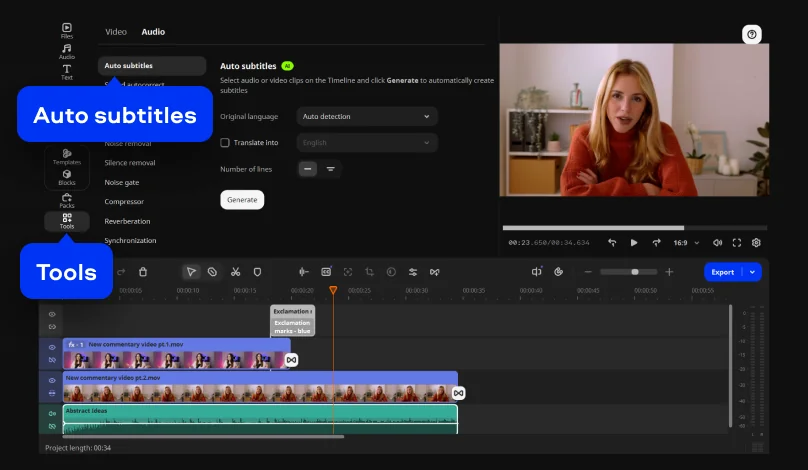
  1. Click your video on the timeline and open Tools.
  2. On the Audio tab, click Auto subtitles.
  3. Pick the language from the Original language list, or let the editor detect it.
  4. Click Generate. The lines appear on the Phrases tab, where you can fix the text.

On the Design tab you can place subtitles at the bottom, center, or top, and change the font, size, and color. Active word highlighting follows your voice word by word, a look that suits tutorials and reviews.

7. Pick the intro and outro templates

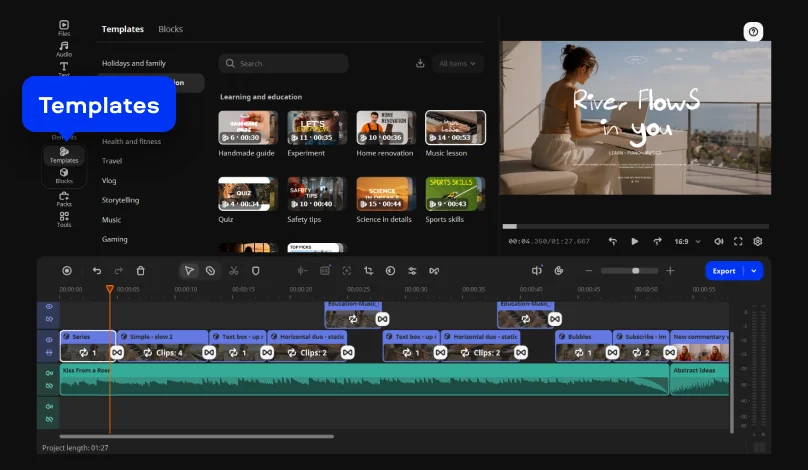
Both come from template categories built for this kind of channel: Learning and education for lessons and tutorials, Gaming for gameplay. The intro video template opens the video, and the YouTube outro video template closes it.

  1. Open the Templates tab.
  2. Choose suitable templates for your intro and outro from the Learning and education or Gaming category.
  3. Drop the templates onto the timeline.
  4. Double-click a Block on the timeline.
  5. Replace the placeholder with your own clip or photo.
  6. Retype the Block text.
  7. Repeat for each Block in the intro and the outro.

8. Export for YouTube

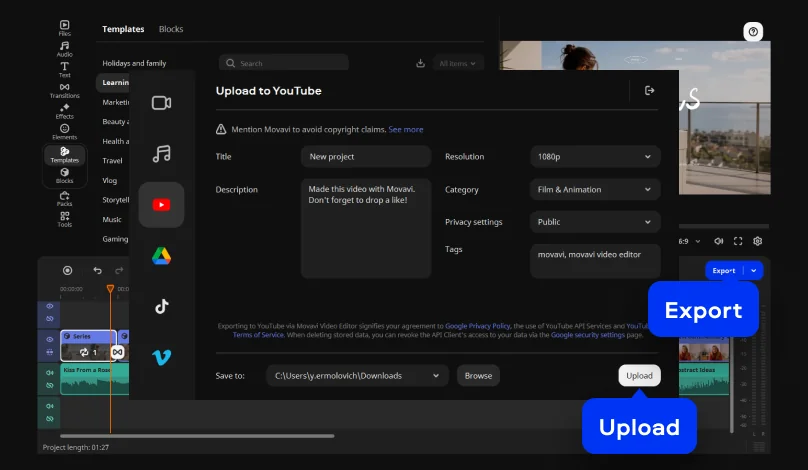
  1. Click the Export button.
  2. Open the Upload to YouTube tab.
  3. Log in your YouTube account, type a title and description, select a resolution and privacy settings.
  4. Click Upload.

YouTube editing tips for screen recordings and gameplay

  1. Record at the size you'll publish. YouTube Help names 16:9 as the standard aspect ratio on a computer, so draw your capture area in that shape. Keep the frame rate you recorded; YouTube asks for uploads in the same rate.
  2. Make the interface big. Raise the font size and zoom level inside the app you're showing before you press REC. A phone screen shrinks everything, and zoom and callouts can only rescue so much. Bigger text at the source means fewer corrections later.
  3. Cut pauses before anything else. A jump cut skips a pause or a flub so your voice keeps moving. Silence removal makes most of them for you, and Split handles the rest.
  4. Change the picture now and then. A zoom, a callout, or a cut to your webcam works as a pattern interrupt: a small visual shift that gives the eye something new. Use it where an explanation gets long, because that's where attention drifts.
  5. Cover rough cuts with b-roll. B-roll is supporting footage that plays while you keep talking, such as a second window, a slide, or a close-up of the setting you describe. For a screen recording, a quick zoom on the detail you mention does the same job.
  6. Blur private details. The Highlight and conceal tool blurs, darkens, or spotlights part of the frame, which keeps passwords and inbox names off screen. The tool also follows a moving object with motion tracking, so a blurred name stays covered when the window moves.
  7. Clean first, then level. Remove noise before you raise the volume, so you lift clean audio instead of a track with hum. Then set copyright-free music from the built-in selection under the voice.
  8. Add chapters to long lessons. YouTube Help says the first timestamp in the description must be 00:00, you need at least three timestamps in ascending order, and each chapter runs at least 10 seconds. Viewers jump straight to the part they need, and your longest lessons stay easy to browse.
  9. Leave room for the end. End screens fill the last 5–20 seconds of a video, so keep the outro inside that window. You add end screens in the Editor of YouTube Studio, which also offers info cards.
  10. Turn one episode into a Short. Auto-tracked cropping keeps the speaker centered while it converts horizontal footage to vertical for YouTube Shorts. One long tutorial then gives you a second video from the same footage.

Quick fixes for common problems

  • The voice sounds thin after noise removal. Lower the strength and compare with the effect on and off. Clean audio should still sound like you.
  • The zoom feels abrupt. Open the clip's keyframes and move them farther apart. Keyframes set when the camera starts and stops, so more distance means a slower move.
  • Subtitles cover something important. Open the Design tab and move them to the top or center, or drag them to a spot you choose.
  • A watermark shows on the export. The Free and Lite versions add one. The full version exports without a watermark.
  • A template Block has the wrong text. Double-click the Block on the timeline and retype it. Nothing in a template is locked.

Short guides for each step

Each of these goes deeper on one part of the workflow:

Examples: three videos, three setups

A tutorial for a program. A teacher records a spreadsheet lesson with Movavi Screen Recorder, voice and cursor effects on. In the editor, the silence removal tool trims the pauses, Pan and zoom closes in on the menu being explained, and auto subtitles carry the lesson for students who watch without sound. A Learning and education intro finishes the look, so the lesson is ready for the class channel.

Gameplay with commentary. A gamer records a match, then splits out the dull stretches in Movavi Video Editor. AI noise removal cleans the microphone track, a webcam overlay puts the reaction in the corner, and a Gaming template opens the episode. The result is a highlight edit with a clear voice over the action.

An app or art review. A creator reviews a new app, or walks through a painting or a film's history, with the webcam in the corner and the screen showing the subject. Callouts point at the details, and the Highlight and conceal tool blurs the account name. Subtitles keep the review readable on a noisy commute.

Checklist before you upload

  • Silence is removed and mistakes are cut.
  • The voice is clean and sits at an even level.
  • Text on screen is readable at phone size, with callouts or zoom where it isn't.
  • Private details are blurred.
  • Subtitles are generated and the lines are proofread.
  • The intro and outro Blocks carry your own clips and text.
  • The outro fits the end-screen window.
  • The file is an MP4 in 16:9.
  • Chapter timestamps are ready for the description.
Movavi Video Editor
Create awesome videos easily

*The free version of Movavi Video Editor may have the following restrictions depending on the build: watermark on exported clips, 60-second video or 1/2 audio length limit, and/or some advanced features unavailable when exporting videos.

Frequently asked questions

Can I upload to YouTube straight from the editor?

Yes. In the Export window, open the Upload online tab, sign in to your account, and add a title and description.

Should I record the webcam together with the screen or separately?

Together is the quicker route: Movavi Screen Recorder overlays the webcam during capture, and you can resize it there. Record separately when you want freedom later. A separate webcam clip sits on its own track, so you can move it between corners, resize it, or reuse the same take in another episode.

Can Movavi Video Editor handle long recordings?

Yes. Pre-timeline trimming pulls short segments out of a long source file before it joins the project, and Fast Track HD acceleration speeds up processing. Both help when a lesson runs long.

Have questions?
If you can’t find the answer to your question, please feel free to contact our Support Team.
Join us for discounts, editing tips, and content ideas

1.5M+ users already subscribed to our newsletter

By signing up, I agree to receive marketing emails from Movavi and agree to Movavi's Privacy Policy.