DESKTOP SCREEN RECORDER
  • Capture everything, not just your browser tabs
  • Highlight keystrokes and mouse actions
  • Draw on videos in real time

Free online screen recorder

  • Webcam
  • Microphone
  • Sound
  • Watermark

Supported browsers: Google Chrome, Mozilla Firefox, Microsoft Edge, Opera

How to Screenshot on an ASUS Computer

Key takeaways

  • Most quick shots on an ASUS laptop have built-in options and are easiest when used through keyboard shortcuts, Snipping Tool, or Xbox Game Bar.
  • While Lightshot and Snip & Sketch are great for a lightweight job, ShareX and Movavi come in handy for scrolling web pages, annotations, or greater workflows.
  • Choose a tool that fits your habits: keyboard shortcuts for quick grabs, ShareX for those who prefer automation, Movavi for long captures or tutorials.
  • Clean up your screen before capture: close extra tabs, raise the brightness, and use basic editing tools to point out what matters.
  • If your screenshots look fuzzy, save them as PNG files for sharper results.

I’ve taken more screenshots while figuring out how to screenshot on an ASUS computer than I’d ever admit publicly, from UI bugs to full-page research notes to the time when my friend renamed all my desktop folders as dessert names, just to see if I would notice. (I didn’t. For three days.)

Over the past few months, I tested every major screenshot tool I could get my hands on, from Windows’ built-ins to the more advanced apps people swear by online. Some were lightning-fast, some were overloaded with buttons, and a few surprised me in ways I didn’t expect.

After trying them all, I put together a curated list of my top picks – the ones that actually made taking screenshots on an ASUS laptop easier, smoother, or at least less chaotic than usual.

disclaimer_person
Our goal is to provide you with only verified information. To ensure this, Movavi Content Team does the following:
  • When selecting products to include in our reviews, we research both demand and popularity.

  • The team tests all the products mentioned in this article.

  • When testing, we compare the key characteristics of the products, which include selecting capture area, schedule recording, showing keystrokes and mouse, and other significant features.

  • We study user reviews from popular review platforms and make use of this information when writing our product reviews.

  • We collect feedback from our users and analyze their opinions of Movavi software as well as products from other companies.

My top picks

Best overall: Movavi Screen Recorder

Scrolling screenshots and clean editing tools make it ideal for when your screenshots often turn into step-by-step guides or tutorials.

Best free option: ShareX

Free and endlessly customizable. It’s my go-to recommendation when someone wants it all and doesn’t mind fiddling with settings.

Best for quick screenshots: Lightshot

Press PrtSc, drag, annotate, save – done. If you take dozens of screenshots a day and don’t need bells and whistles, this one feels like a tiny superpower.

Best for built-in convenience: Windows Snipping Tool

Already installed on every ASUS laptop with Windows 10 or 11, this is reliable, simple, and now faster after Microsoft’s recent updates.

Best for gamers or multitaskers: Xbox Game Bar

Press Win + G and the overlay floats in – perfect for quick captures in games or apps without leaving fullscreen mode.

Comparison table: How to take a screenshot on an ASUS laptop

Program

Best for

Download

Scrolling screenshots, tutorials, screen recording

Fast, built-in screenshot capture with zero setup

Simple editing, region captures, quick markup

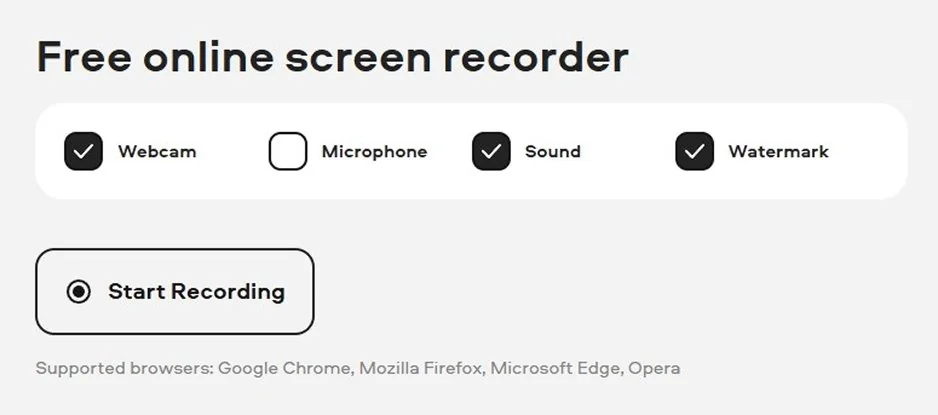
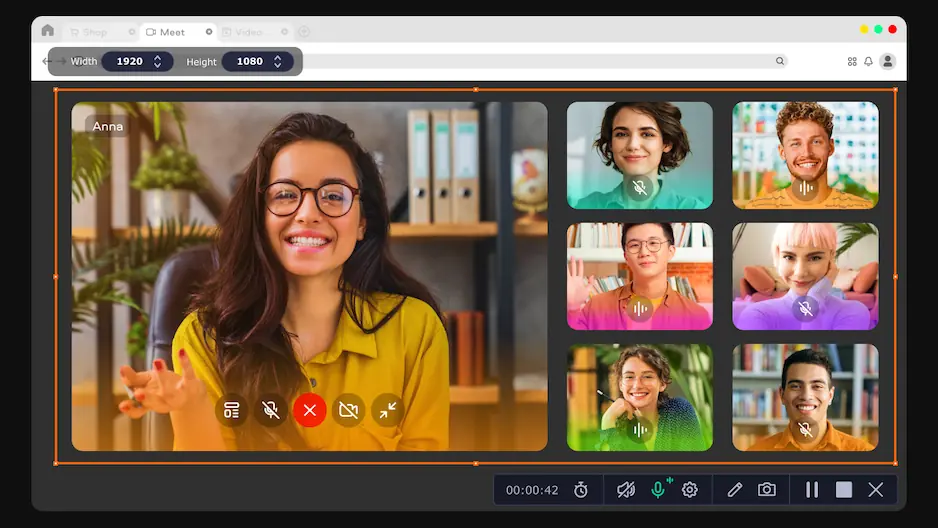
Screencapture.com isn’t actually a screenshot tool – it’s a free, browser-based screen recorder. I use it when I need a quick video demo without installing anything. It captures your screen, mic, and system audio right from the browser and saves the recording as a clean MP4.

There’s no option to grab still screenshots, but for fast, no-install video capture – especially when you’re borrowing someone else’s ASUS laptop or working on a locked-down system – it’s surprisingly handy.

1. Keyboard shortcuts for taking screenshots on ASUS laptops

Why I picked it: they’re baked right into Windows, they respond instantly on every ASUS I’ve ever used, and they’re perfect for those moments when you need a screenshot right now and don’t want to launch anything.

OS: Windows 10, Windows 11

I’ve leaned on Windows keyboard shortcuts for ages because they behave exactly the way you expect – no surprises, no drama. On some ASUS models, especially the slimmer ZenBook designs, the Print Screen key hides behind Fn, which feels annoying for about five minutes. After that, it’s muscle memory.

The shortcuts themselves haven’t changed much, but Windows 11 did smooth out a few rough edges. The clipboard preview pops in faster, the Snipping Tool blends in more neatly, and the whole setup feels less temperamental than it used to. Microsoft even folded Snip & Sketch into the classic Snipping Tool, which finally made the whole screenshot experience feel like it belongs in one place.

Most days, I use these shortcuts when I just need a clean full-screen grab or want to paste something straight into a doc. It’s not glamorous, but it works – like that old pen in your drawer that somehow writes better than the fancy ones.

How to screenshot on an ASUS laptop using keyboard shortcuts

1. PrtSc / Fn + PrtSc (copy full screen to clipboard)

  1. Press PrtSc. (On some ASUS laptops, press Fn + PrtSc.)
  2. The screenshot is copied to your clipboard.
  3. Paste it into any app: Paint, Word, Messenger, email, whatever you’re using.

2. Windows Key + PrtSc (save a full-screen screenshot as a file)

  1. Press Windows Key + PrtSc.
  2. The screen will dim for a second.
  3. Windows saves the screenshot automatically to the Pictures > Screenshots folder.

3. Win + Shift + S (open the Snipping Tool overlay)

  1. Press Win + Shift + S.
  2. A small toolbar appears at the top of the screen.
  3. Choose what you want to capture: Rectangular snip, Freeform snip,Window snip, Full-screen snip
  4. The screenshot goes to the clipboard and shows a preview in the corner.
  5. Click the preview if you want to edit or save it.

2. Snipping Tool for Windows

Why I picked it: it’s already installed, and the updated version feels noticeably smoother after Microsoft merged it with Snip & Sketch.

OS: Windows 10, Windows 11

I use Snipping Tool when I need more control than a simple Print Screen shortcut. The app recently got a noticeable refresh – Microsoft rolled out upgraded editing tools, better notifications, and improved clipboard previews. It also added a screen-recording mode and a built-in video export feature.

Snipping Tool feels more responsive now. When I drag a region, the capture outline no longer jitters the way it used to on my older ASUS Vivobook. I especially like the delay timer when I need to capture menus – it’s such a tiny feature, but it saves me from awkward finger acrobatics.

How to take a screenshot with Snipping Tool

  1. Press Win + Shift + S or open Snipping Tool from the Start menu.
  2. Choose the snip mode: Rectangular, Freeform, Window, or Full Screen.
  3. Select the area you want to capture.
  4. Click the preview in the corner to edit, highlight, or save.

ratings

Pros:
Cons:

3. Windows Snip & Sketch

Why I picked it: it’s quick, lightweight, and still one of the easiest ways to grab a region screenshot without opening a full app.

OS: Windows 10 (preinstalled), Windows 11 (legacy version still accessible through search)

I still use Snip & Sketch out of habit – mostly because Win + Shift + S feels like muscle memory at this point. Even though Microsoft merged it with the Snipping Tool in 2023, the standalone Snip & Sketch app still works on many ASUS laptops running Windows 10 or early Windows 11 builds. It behaves like a stripped-down notepad for screenshots: fast, instantly responsive, and good at the basics.

The editing canvas is simple – marker, highlighter, cropping – nothing fancy, but enough to annotate a bug report or highlight a menu on the fly. What I still love is that the capture goes straight to the clipboard with zero ceremony. It’s the screenshot equivalent of grabbing a sticky note.

How to take a screenshot with Snip & Sketch

  1. Press Win + Shift + S.
  2. Pick the capture mode: rectangular, freeform, window, or full screen.
  3. Select the area you want.
  4. Click the preview that appears in the corner to edit or save.

ratings

Pros:
Cons:

4. Xbox Game Bar

Why I picked it: it’s already built into Windows, and the screenshot shortcut feels almost too easy – like discovering a secret door in a house you’ve lived in for years.

OS: Windows 10, Windows 11

I started using Xbox Game Bar for screenshots by accident – I hit Win + G while trying to open Gmail, and suddenly a whole dashboard slid onto my screen like a gaming HUD. It grew on me fast. The overlay lets you grab screenshots, record your screen, check performance stats, and even control Spotify without leaving whatever you’re doing. Microsoft quietly pushed stability improvements and UI tweaks in their Xbox Game Bar updates, especially around capture performance and HDR handling.

One thing I appreciate: screenshots land directly in the Captures folder as PNGs – clean, consistent, no clipboard hopping. It’s the tool I use when I need quick images while testing games or apps, or when I simply don’t feel like opening anything else. Fun fact: the Game Bar overlay still works even if your laptop has never run a single game in its life – my old ASUS VivoBook is living proof.

How to take a screenshot with Xbox Game Bar

  1. Press Win + G to open the Game Bar overlay.
  2. Look for the Capture widget (camera icon).
  3. Click the camera button Screenshot.
  4. Find the saved image in: Videos > Captures

You can also press Win + Alt + PrtSc to take a screenshot instantly without opening the overlay.

Pros:
Quick summary
  1. Best for full-page captures and tutorials: Movavi Screen Recorder

  2. Fastest for everyday use: Keyboard shortcuts


  3. Best free advanced tool: ShareX

5. Movavi Screen Recorder

Why I picked it: it keeps things simple – a click or two and you’ve got a screenshot or a full video recording, no fuss.

OS: Windows 10 / Windows 11 (also macOS, but here we focus on Windows)

I turn to Movavi Screen Recorder when I need something more flexible than a keyboard shortcut or basic Snip. It does screenshots, long/scrolling captures, video recordings (with audio or mic), webcam overlays, cursor highlighting – you name it. Recently the developers updated the app’s UI and improved scrolling screenshot stability, which makes it much smoother than older versions.

When I capture a full web page or a long chat thread, Movavi handles scrolling screenshots gracefully – it automatically scrolls and stitches the result into one long image. I’ve used it to grab long receipts or entire thread conversations – and it nails them cleanly every time.

It’s the tool I reach for when I want power without overthinking: either a perfect screenshot, or a screen-recording demo with audio and cursor highlights.

How to take a screenshot with Movavi Screen Recorder

Step 1. Download & install

Download the latest version for Windows. Run the installer and follow the on-screen instructions. Launch the program after the installation.

Step 2. Choose screenshot mode and perform the capture

In the main sidebar, click the Screenshot (camera) icon. A small overlay appears. You can choose between:

  • Capture a region – draw a box around the area.
  • Full screen – capture the entire display.
  • Window – capture a single application window.

Scrolling screenshot – for long webpages or documents that don’t fit the screen.

For a standard screenshot: draw/select the area (or choose full screen/window), then confirm > image gets captured.

For a scrolling screenshot: after clicking Scrolling screenshot, click the window you want to capture; Movavi will automatically scroll and stitch the screenshot. Press Esc when the scroll ends or you’re done.

Step 4. Edit / annotate (optional)

After capture, you’ll see the built-in editor. Use tools like text, arrows, shapes, cropping to highlight or annotate parts of the screenshot.

Step 5. Save the image

Finally, copy your screenshot to clipboard or save it.

ratings

4.6/5

4.5/5

Pros:
  • Captures full screen, custom area, single window, or scrolling pages

  • Built-in editor: annotate, crop, add arrows/shapes/text instantly

  • Also records video + audio + webcam if needed – handy for tutorials or demos

  • Saves screenshots and recordings directly to files

Cons:
  • Free trial adds watermark

6. Lightshot

Why I picked it: it’s fast, minimal, and always there when I need a no-nonsense screenshot in two clicks.

OS: Windows 10, Windows 11 (also macOS)

I’ve used Lightshot for years because it launches like a reflex – hit PrtSc, drag, done. No interface clutter, no five-step menus. The charm of Lightshot is that it makes screenshots feel almost casual: draw your box, slap on a quick arrow or highlight, and save or copy instantly.

One thing people forget: Lightshot has built-in reverse image search. I’ve used it to identify fonts, products, and once even a bizarre plant someone posted in a Slack chat. That one turned out to be a cactus shaped like a goose – I regret clicking that link, but Lightshot did its job.

How to take a screenshot with Lightshot

  1. Install Lightshot and launch it (it runs in the background).
  2. Press PrtSc – Lightshot takes over the key.
  3. Drag to select the area you want.
  4. Use the mini toolbar to annotate (arrows, text, lines).
  5. Save, copy, or upload the screenshot.

ratings

7. ShareX

Why I picked it: it does everything – screenshots, scrolling captures, GIFs, auto-uploads – and it’s free. Once you get used to it, it feels like having a tiny control center hiding in your taskbar.

OS: Windows 10, Windows 11

ShareX is the tool I install when I know I’ll be taking a lot of screenshots. It’s open-source, which means the devs constantly tinker and push updates that actually matter – performance fixes, file-naming automation, better scrolling capture, and the infamous “workflow” system that lets you automate almost anything. The latest release added improvements to region selection and fixed bugs with delay captures – small, but noticeable when you use the app daily.

What I love most is how customizable everything is. Want every screenshot to automatically save into a specific folder, rename itself, convert to PNG, upload to Dropbox, and copy the link to your clipboard? ShareX can do that – maybe a little too eagerly if you turn everything on at once.

Funny side note: I once accidentally set up an automated workflow that uploaded every screenshot to Imgur. I discovered this when Imgur emailed me, politely asking if I intended to upload 47 pictures of spreadsheets. Lesson learned.

How to take a screenshot with ShareX

  1. Install and open ShareX.
  2. Press PrtSc (or your assigned hotkey).
  3. Select the capture type: region, window, full screen, or scrolling capture.
  4. Capture the area.
  5. ShareX will automatically save, copy, or upload the file according to your settings.

ratings

Pros:
Cons:

How to take a screenshot on an ASUS laptop

So the real trick, if you’re figuring out how to take a screenshot in an ASUS laptop, is choosing the tool that matches your daily habits. If you like quick, no-nonsense captures, stick with keyboard shortcuts or Snipping Tool. If your screenshots often turn into tutorials, Movavi Screen Recorder handles long pages and recording without breaking a sweat. Lightshot is great when you want something simple and unobtrusive, while ShareX is perfect if you enjoy automation and want your screenshots to practically organize themselves. And if you’re gaming or multitasking, Xbox Game Bar slides in without interrupting anything.

Movavi Screen Recorder
The perfect way to record anything from your screen

Disclaimer: Please be aware that Movavi Screen Recorder does not allow capture of copy-protected video and audio streams.

Movavi Screen Recorder

Frequently asked questions

How do I do a screenshot on an ASUS laptop?

The quickest method is to press PrtSc (sometimes Fn + PrtSc on ASUS keyboards). This copies the screenshot to your clipboard – just paste it into Paint, Word, or any messenger. If you want a ready-to-save file, use Windows + PrtSc, and Windows will drop a PNG straight into the Pictures > Screenshots folder. For more control, press Win + Shift + S to open the Snipping Tool overlay.

How do I screenshot on my ASUS laptop without a Print Screen button?

No Print Screen key? No problem. If you’re trying to figure out how to screenshot on an ASUS laptop without a PrintScreen button, don’t worry – you still have options. Press Win + Shift + S – this opens a modern screenshot overlay where you can grab a region, window, or the entire screen. You can also open the Snipping Tool from the Start menu and take screenshots from there, all without touching the PrtSc key.

How do you screenshot on an ASUS Chrome laptop?

On an ASUS Chromebook, the keys are different:

  • Press Ctrl + Show Windows (that rectangle-with-two-lines key) to take a full-screen screenshot.
  • Press Ctrl + Shift + Show Windows to take a partial screenshot.

ChromeOS saves your captures automatically to the Downloads or Screenshots folder.

How do I capture a screenshot on my laptop?

It depends on what you prefer:

  • Fastest: Press PrtSc > paste anywhere.
  • File immediately: press Windows + PrtSc.
  • More control: Win + Shift + S for a region/window snip.
  • Scrolling pages or tutorials: use an advanced tool like Movavi Screen Recorder or ShareX.

Every Windows laptop – ASUS included – supports these methods out of the box.

Have questions?
Have questions?
If you can’t find the answer to your question, please feel free to contact our Support Team.
Join us for discounts, editing tips, and content ideas

1.5M+ users already subscribed to our newsletter

By signing up, I agree to receive marketing emails from Movavi and agree to Movavi's Privacy Policy.