How to Crop a Screenshot on a Mac

  • Capture everything, not just your browser tabs
  • Highlight keystrokes and mouse actions
  • Draw on videos in real time

Free online screen recorder

  • Webcam
  • Microphone
  • Sound
  • Watermark

Supported browsers: Google Chrome, Mozilla Firefox, Microsoft Edge, Opera

Edited by
Ben Jacklin
3379

How to take a screenshot on Mac and crop it

Key takeaways

  • Want an immediate answer to “how to crop a screenshot on a Mac?” Movavi Screen Recorder just delivers. It offers the fastest way to capture and crop a screenshot on macOS.
  • Built-in tools like Screenshot and Preview give you basic picture edits such as cut, resize, and rotate.
  • Screencapture.com records video but does not capture still images. But you can safely use it as a support tool. 
  • Choose your software based on speed, picture size, editing depth, and how many screenshots you plan to process.
  • For cleaner results, keep your desktop background simple and turn off window shadows before you crop.

People assume screenshots on a Mac always feel simple, yet I have seen enough messy captures to know that the process deserves a clean guide. I work with media files every day. It started as a quick way to share projects with friends, then grew into something bigger.

Editing pictures and movies became the place where I express myself. I like seeing neat lines, accurate frames, and pictures that say exactly what I planned. I test every solution that crosses my desk, so I spent the past few weeks comparing ways to crop screenshots on a Mac.

I began with built-in tools because they sit right there on every MacBook. They do the job, and I use them often. Still, I always return to Movavi Screen Recorder. It fits the way I work. It captures clean picture files and cuts them with precision. It suits hobby users and people who create content daily. After dozens of captures and edits, I made a list of the best workflows. These steps cover every level of Mac experience.

One small note before we start. Keep your Mac updated. New system versions adjust small details in the Screenshot app, and those small changes improve speed. Now, let us look at an online pick first, then move into real screenshot tools.

Special pick: Screencapture.com

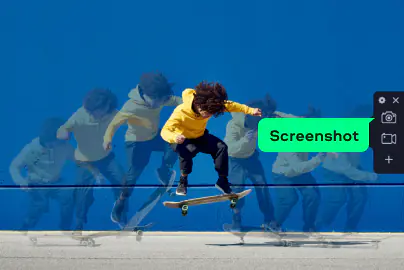
Before I explain how to screenshot on a Mac and crop, I’d like to deviate a bit from the topic. I first started with this special tool for one simple reason. I often record the steps I take before I crop a screenshot, and this site helps me show that flow in a short video. So it earns a place here, even if the topic revolves around cutting an image on a Mac.

Screencapture.com runs in any modern browser on a MacBook. Chrome, Safari, Firefox, and the others handle it without trouble. The tool is primarily designed to record a video, not still pictures, so I use it when I want someone to see my screen video. A quick clip often answers a question faster than a written message.

The page loads in a second. You press one button, and the capture starts. The picture stays sharp at standard sizes, and the file comes out in formats people use every day. It does not take the role of a screenshot app. It works as a support tool when video matters.

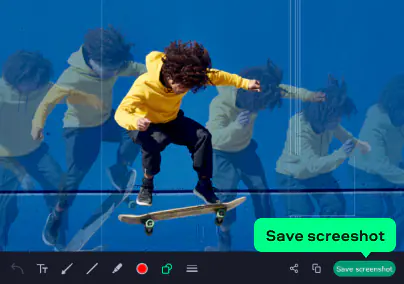
The online version also covers common needs. You pick whether you want camera input, system sound, or both. You let the site access the mic or cam. Then you choose a tab, a window, or the whole desktop. One click on Share starts the process, and you stop it whenever the point is made. After that, you download the file or record another run.

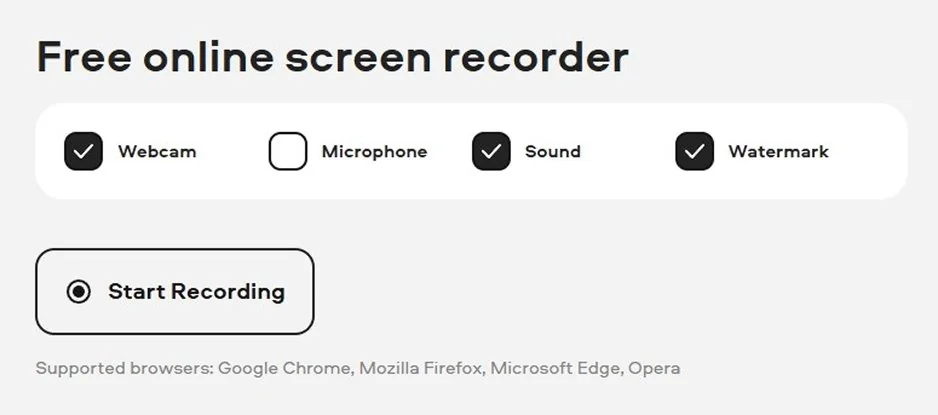
It supports major browsers used on macOS. It works free of charge. People in many countries use it, and the interface stays simple. That is why I keep it in the toolkit. It lets me explain a screenshot task with a short clip, even when the work itself deals with cutting still images on a Mac.

disclaimer_person
Our goal is to provide you with only verified information. To ensure this, Movavi Content Team does the following:
  • When selecting products to include in our reviews, we research both demand and popularity.

  • The team tests all the products mentioned in this article.

  • When testing, we compare the key characteristics of the products, which include selecting capture area, schedule recording, showing keystrokes and mouse, and other significant features.

  • We study user reviews from popular review platforms and make use of this information when writing our product reviews.

  • We collect feedback from our users and analyze their opinions of Movavi software as well as products from other companies.

Movavi Screen Recorder
The perfect way to record anything from your screen

Disclaimer: Please be aware that Movavi Screen Recorder does not allow capture of copy-protected video and audio streams.

Movavi Screen Recorder

How to screenshot on a Mac using built-in tools

MacBooks have more screenshot shortcuts than many users realize. Apple built them into macOS so you can print screen anything without extra apps. The key commands stay the same on most models from the past decade, so these steps cover old and recent machines.

Shortcuts

Shortcuts are the key commands that make capturing your Mac screen fast and precise. They let you take full-screen shots, select regions, or capture individual windows without opening any extra apps.

  • Shift + Command + 3 saves the entire screen.
  • Shift + Command + 4 turns the cursor into a crosshair. You click and drag to capture a region.
  • Shift + Command + 4, then Space, captures a window when you click it.
  • Shift + Command + 5 opens a small control bar with options for screen, window, and region capture.

After you take a screenshot, the Mac shows a small thumbnail in the lower right corner. Click it. A simple editor opens. This editor lets you crop, rotate, draw basic lines, remove parts of the picture, and save.

Screenshot

Now, Screenshot. This utility lets you seize anything visible on your Mac monitor. You can grab the entire display, a specific window, or a custom region. It’s built into macOS. For you, that means you need not to fetch any extra apps.

How to crop with Screenshot:

  1. Press Shift + Command + 5. A control bar appears.
  2. Capture your screen using the region tool or any other capture button.
  3. Select the thumbnail that appears at the bottom right.
  4. The editor opens. Select the crop icon from the top toolbar.
  5. Drag the corners until you get the picture size you want.
  6. Click Done. The Mac saves the picture.

The built-in crop utility works well for quick edits. It helps when you need a small cut or a tight frame around text. You can also adjust the picture after saving it. Preview tackles that.

Preview

Preview is the default image and PDF viewer on a Mac. You can find it in the Applications folder or by searching with Spotlight. It opens most picture formats, and it gives more editing options than the Screenshot editor.

How to crop a screenshot in Preview:

  1. Open the screenshot in the Preview app.
  2. Select the rectangular selection tool at the top.
  3. Drag the box around your target area.
  4. Use Tools in the menu bar and click Crop.
  5. Save the picture.

Preview gives you more editing options than the Screenshot panel. You get rotation, image resize, quality sliders, annotations, a color panel, and text. I like it for basic cleanup work.

How to screenshot on a Mac using Movavi Screen Recorder

Movavi Screen Recorder sits at the center of my work. I edit pictures and video every day, and this program stays open on my desktop. I like its speed. I like the way it keeps controls simple. I use it for single captures and large batches. I also get strong picture quality each time I export a file.

The program runs on macOS Ventura, Sonoma, and earlier versions. It works on Intel and Apple Silicon. I have tested it on both, and the performance feels smooth on each one. Movavi saves screenshots in clean PNG or JPG files. The crop tool responds fast. The interface stays tidy, so nothing pulls your attention away from the picture.

Core capacities:

  • You get a dedicated screenshot button
  • It supports both system audio and mic audio
  • You can take scrolling screenshots (useful for long webpages)
  • It gives real-time drawing tools: arrows, shapes, highlights
  • The interface is clean and fast. I rarely feel like the software gets in the way.

Steps to take a screenshot with Movavi Screen Recorder:

Step 1. Install Movavi Screen Recorder

Download the installation file and install the program on your Mac. Launch the app from your Applications folder or the Dock.
In newer macOS versions, you must allow screen recording, accessibility, and microphone in System Preferences > Security & Privacy.

Step 2. Select the area to capture

On the Movavi toolbar, click the camera icon to switch into screenshot mode.
Once in screenshot mode, drag to define the region you want to capture. You can also capture the full screen or a window.

Step 3. Take the screenshot

Movavi gives you a few options:

Copy to clipboard – good for fast pasting into docs or chat.

Save screenshot – saves immediately into a folder you choose.

Edit – lets you open the screenshot in its built-in editor for quick tweaks.

I use Movavi for precise cuts and clean lines. The output looks better than the built-in editor when you crop small details or when you need straight borders. If you create content for tutorials or guides, Movavi simply delivers smoother results. It works well with large images too, so you do not lose detail.

Movavi Screen Recorder also helps when you need consistent image sizes. You adjust the crop box once and repeat the same size for the next capture. This creates a neat set of pictures with matching dimensions.

Conclusion

So, how to edit a screenshot on a Mac? You've got some choices by now. Which tool fits depends on how you like to work. When I need a quick capture, I turn to built-in instruments because they’re dexterous, the results are clean, and the shortcuts feel intuitive.

For real editing (when I want crisp quality, control, and speed), Movavi Screen Recorder is my go-to. I open it for tutorials, demo workflows, or when I need to grab a bunch of screenshots quickly.

If I already saved a screenshot and want to clean it up, Preview helps me crop, rotate, or annotate easily. It’s covered in the built-in tools chapter.

All of these platforms come into play at different times, but Movavi Screen Recorder remains at the heart of my work. It keeps my workflow tight, lets me capture exactly what I need, and keeps my screenshots clean and high quality.

Frequently asked questions

What is the shortcut for crop image on a Mac?

MacBooks do not have a direct crop shortcut. You take a screenshot first with Shift + Command + 3 or Shift + Command + 4. Then you open the thumbnail or open the image in Preview, where you select the area and click Crop.

How do I crop a screenshot on a Mac?

Capture the screen, click the thumbnail, select the crop tool, adjust the box, then click Done. You can also open the picture in Preview and crop it from the Tools menu.

How do I crop part of a screenshot?

Press Shift + Command + 4. Drag the cursor around the part you want. Save the image. Then crop it again in Preview if you want a tighter cut.

How do I edit screenshots on a Mac?

Open the screenshot. Use the editor in the thumbnail or open Preview. You can crop, resize, rotate, draw lines, add text, adjust colors, and export new picture versions.

Have questions?
Have questions?
If you can’t find the answer to your question, please feel free to contact our Support Team.
Join us for discounts, editing tips, and content ideas

1.5M+ users already subscribed to our newsletter

By signing up, I agree to receive marketing emails from Movavi and agree to Movavi's Privacy Policy.