How to Record a YouTube Video: A Complete Guide for Creators

  • Capture everything, not just your browser tabs
  • Highlight keystrokes and mouse actions
  • Draw on videos in real time

Free online screen recorder

  • Webcam
  • Microphone
  • Sound
  • Watermark

Supported browsers: Google Chrome, Mozilla Firefox, Microsoft Edge, Opera

Edited by
Ben Jacklin
11233

Key takeaways

  • Screen recording remains a reliable, cost-effective way to capture YouTube videos with perfectly synced video and audio.
  • You can record YouTube videos on Windows, Mac, iOS, and Android without installing extra apps by using their built-in screen recorders.
  • Browser-based recorders are helpful for quick captures but often limit recording length, quality, and audio sources.
  • To record YouTube audio properly, system audio must be enabled in your recording settings to prevent capturing silent footage.
  • Always run a short 5 to 10 second test run to verify your audio levels, capture area, and performance before starting a long recording.

When I first considered creating YouTube videos, I assumed it would drain my wallet. In my mind, you needed a camera setup, tripods, lights, you know, the full production package, before you could record anything worth posting. I even started saving for gear because I thought that was the only way to get started. It took me a while to realize you can record a solid YouTube video with almost zero budget using the built-in screen recorder on your device.

However, discovering that didn’t magically make the process simple. I still remember my first attempt at recording a YouTube video. I hit record, captured a full 20 minutes, and only afterward realized I had recorded my webcam instead of my screen. That moment taught me the hard truth: recording isn’t just about pressing a button. I realized that understanding the right recording method makes all the difference.

Over the past few years, I've tested every major recording method available across different devices and platforms. Whether you need to save a tutorial for offline viewing, capture a live stream, or create reaction content, I've figured out which techniques actually work and which ones waste your time. I've made all the mistakes, so you don't have to. In this guide, I'll walk you through the exact methods I use to record YouTube videos reliably.

My top picks

Best overall method: screen recording with a dedicated tool (e.g., Movavi Screen Recorder)

This method often delivers the cleanest, most reliable captures; you get precise control over your recording area, synced system audio, webcam overlay options, and built-in editing tools, making it an ideal choice for professionals.

Best free method: built-in OS screen recording

Windows Game Bar and the macOS Screenshot Toolbar launch instantly with keyboard shortcuts. No setup, no installation, and no learning curve compared to using dedicated tools.

Best for quick captures: browser extension recording

Extensions like Loom or Awesome Screenshot let you record directly from your browser tab. This is the fastest way to capture short clips without opening the full software.

Best for mobile: native screen recording

The built-in recorders on iOS and Android handle YouTube playback smoothly and save directly to your device library, making them perfect when you're away from your computer.

Capture YouTube video: recording methods overview

Method

Description

Install a dedicated recording app like Movavi Screen Recorder for professional captures with editing capabilities

Use Windows Game Bar (Win + G) or macOS Screenshot Toolbar (Cmd + Shift + 5) for native recording. Meanwhile, the Windows Game Bar is also optimized for recording gameplay and video content.

Add a Chrome/Firefox/etc. extension to record directly from your browser window

Use iOS Control Center or Android Quick Settings native screen recorders

disclaimer_person
Our goal is to provide you with only verified information. To ensure this, Movavi Content Team does the following:
  • When selecting products to include in our reviews, we research both demand and popularity.

  • The team tests all the products mentioned in this article.

  • When testing, we compare the key characteristics of the products, which include selecting capture area, schedule recording, showing keystrokes and mouse, and other significant features.

  • We study user reviews from popular review platforms and make use of this information when writing our product reviews.

  • We collect feedback from our users and analyze their opinions of Movavi software as well as products from other companies.

How to record YouTube videos on desktop

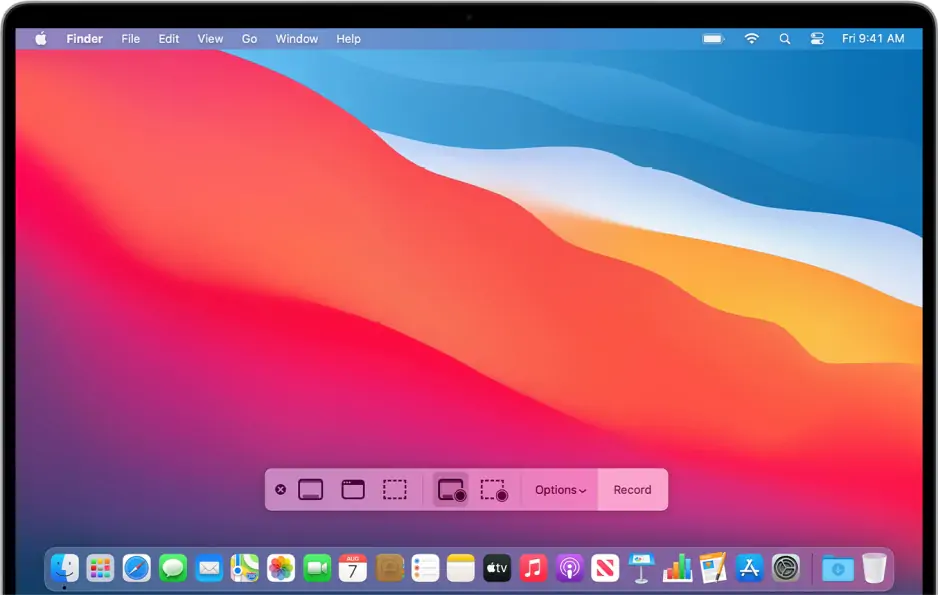
1. Screen recording software method

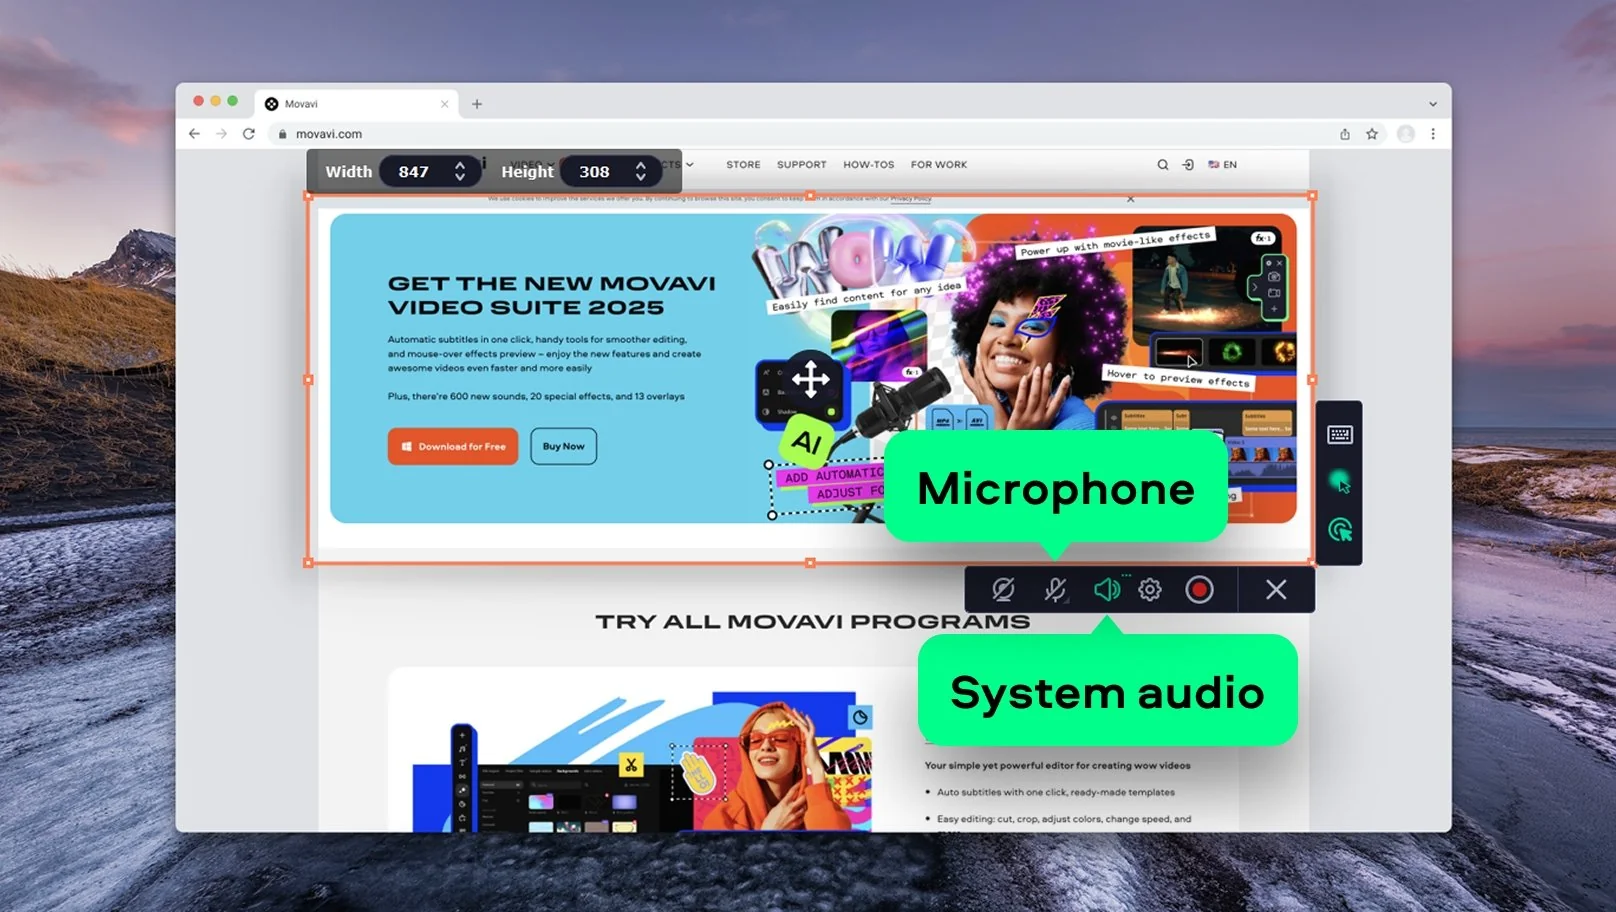
Why I picked it: It delivers the most reliable results with synced audio and full control over what you capture. The extra tools, such as area selection, webcam overlay, and scheduling, make it far more versatile than basic recorders.

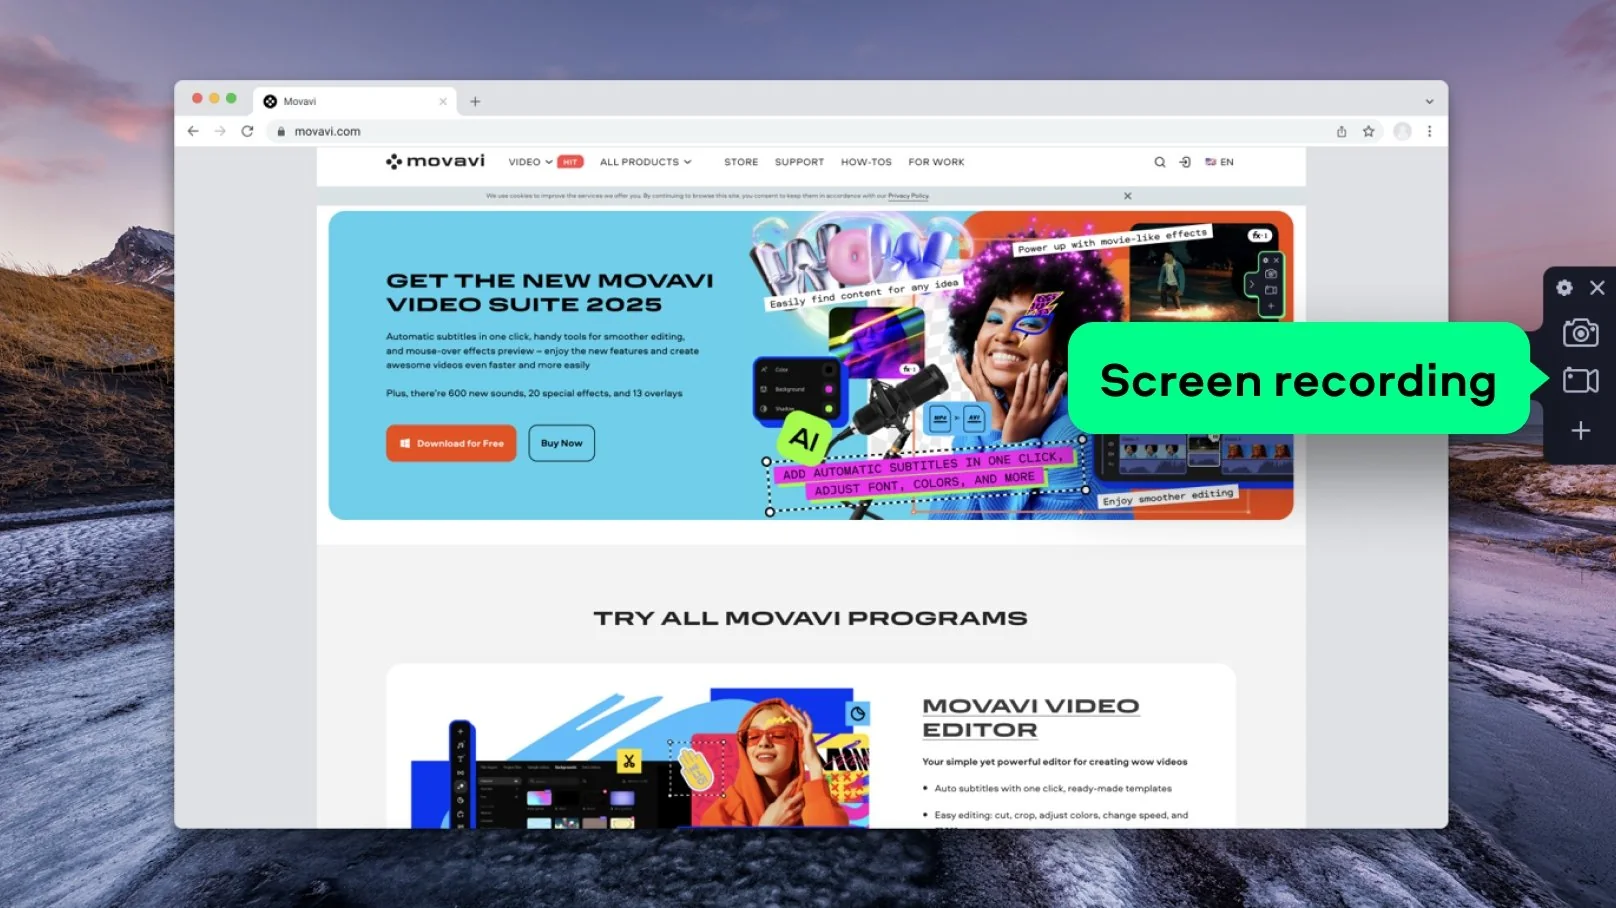
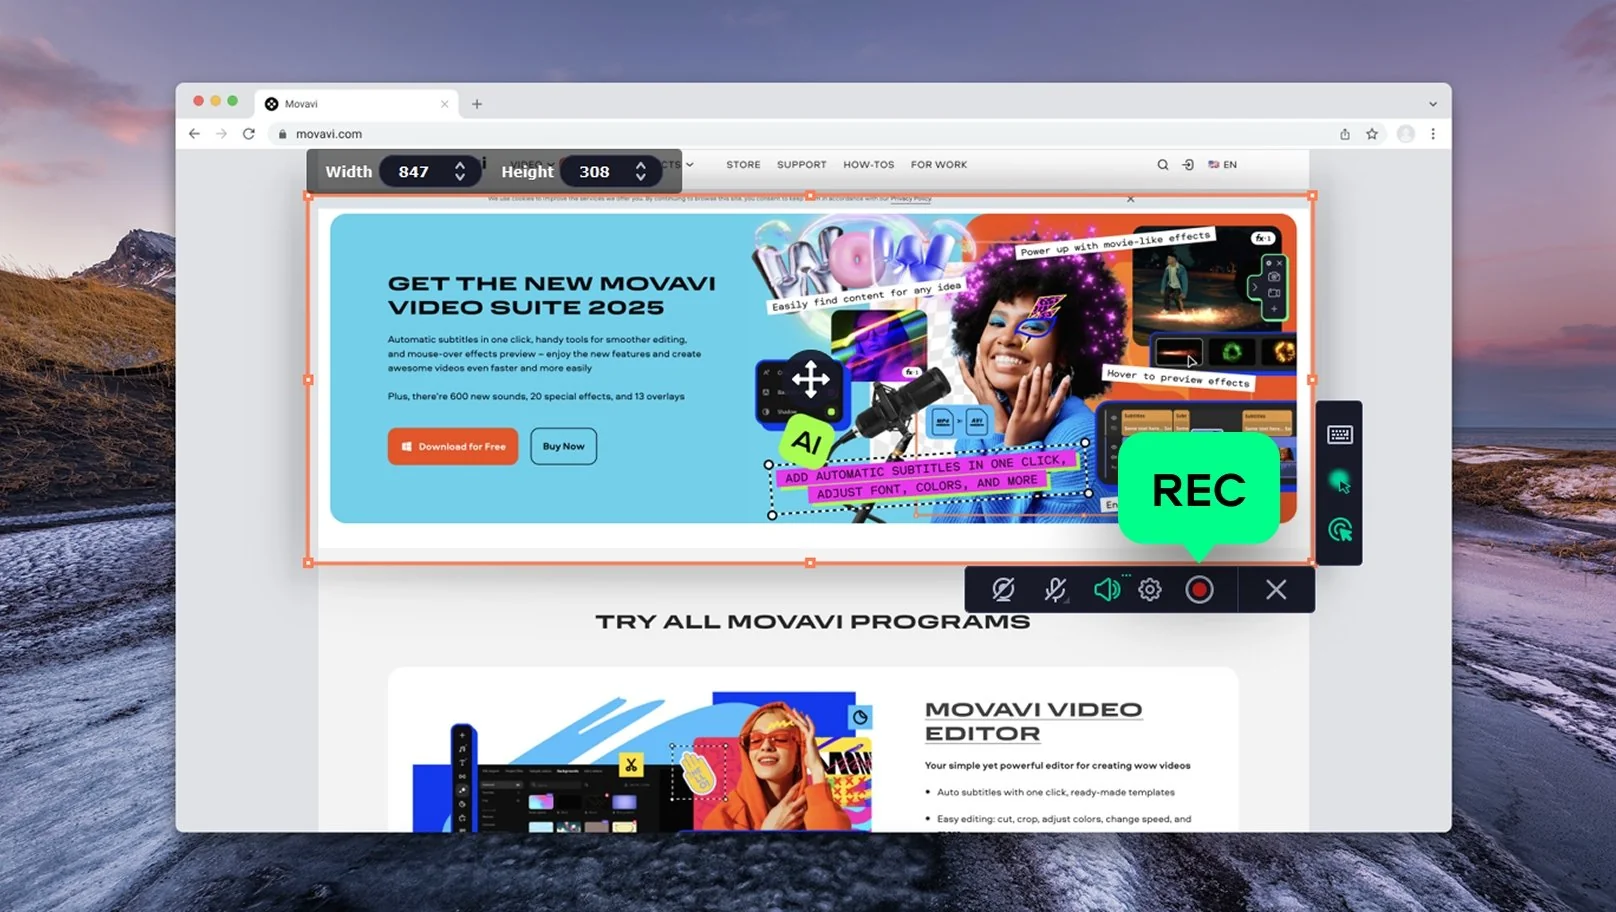
After testing various approaches, I found that using proper screen recording software like Movavi Screen Recorder eliminates the most common problems - audio sync issues, quality loss, and complicated setup processes. Honestly, what makes this method stand out is the level of control you get.

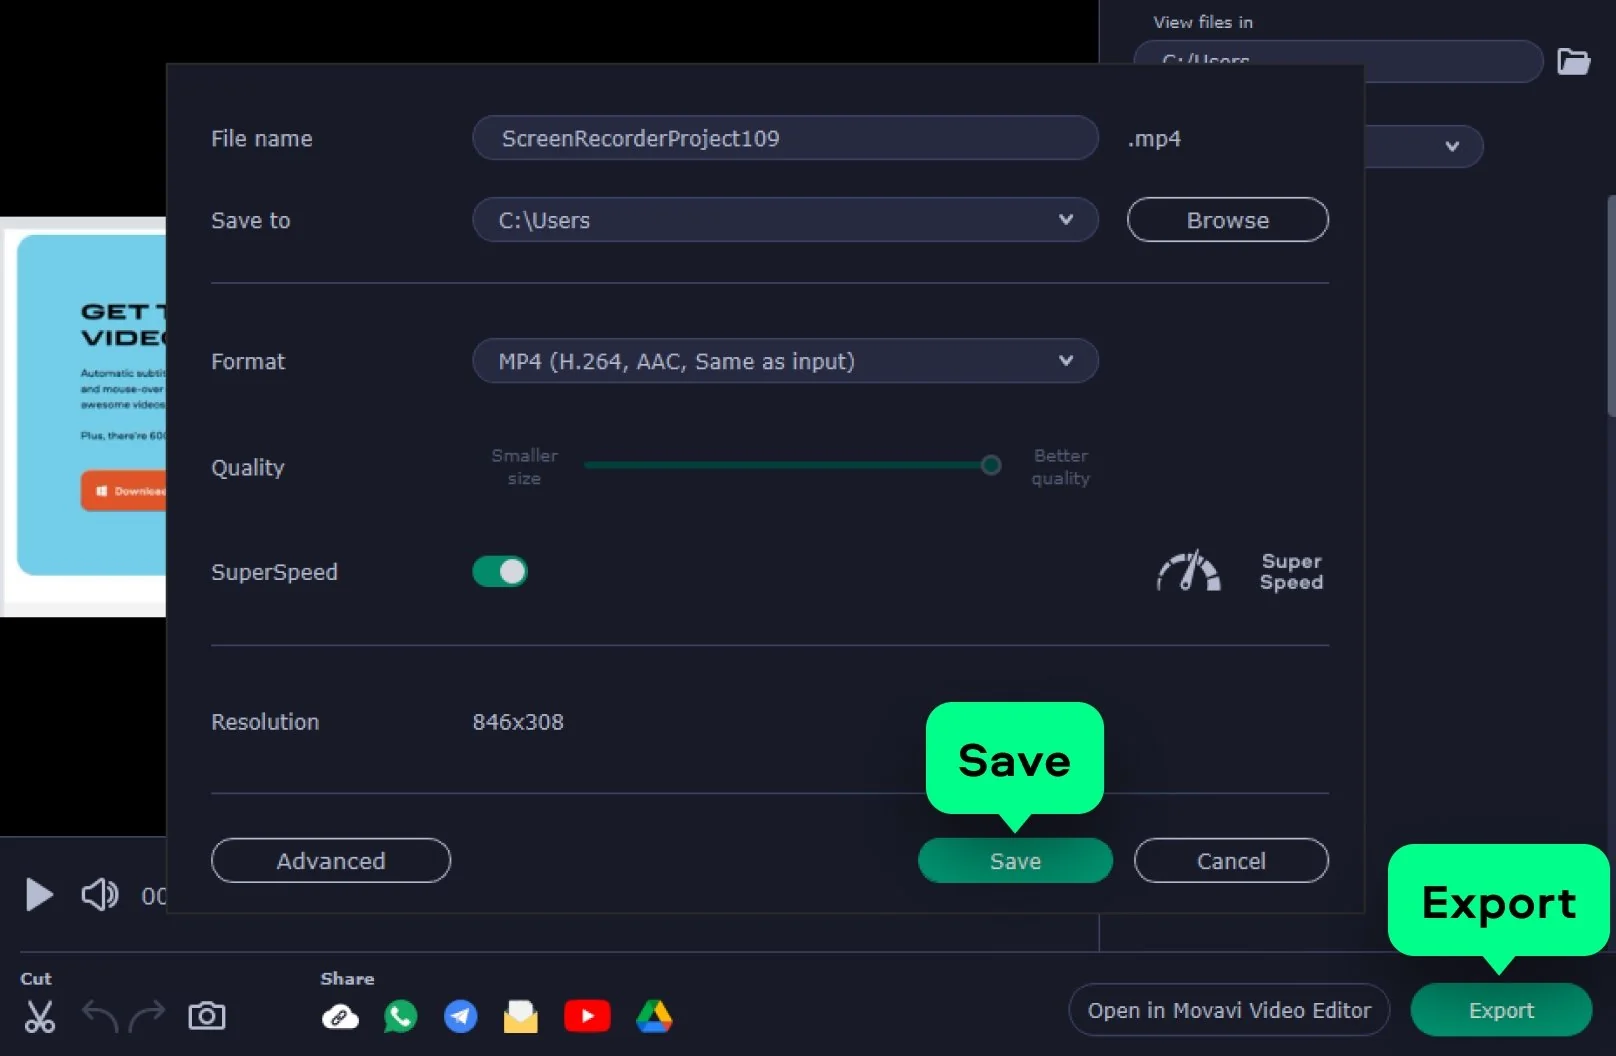
When I record YouTube videos using Movavi Screen Recorder for instance, I can select exactly which area of my screen to capture, choose my audio sources independently, add webcam overlays, and even schedule recordings to start automatically. The built-in editor means I don't need to export to another program for basic trimming and adjustments.

According to user feedback across review platforms, dedicated screen recording software maintains satisfaction ratings around 4.5/5, with users consistently praising the reliability for long recordings and the absence of random crashes that plague simpler methods.

Step-by-step instructions (for Movavi Screen Recorder)

Step 1. Install your recording software

Download and install Movavi Screen Recorder from the official website.

Step 2. Launch the application

Open the program, and the recording control panel appears automatically.

Step 3. Configure your preferred shortcuts/hotkey

Similar to built-in tools, Movavi screen recording software also makes it possible for me to customize specific hotkeys to trigger the recording tool or to quickly capture any part of my screen. If you need the same, you can navigate to the program setting to customize preferred hotkey(s) for specific actions.

Step 4. Select your capture area

  • Choose Full Screen to capture your entire display
  • Select Custom Area and manually drag to frame just your browser window
  • Or pick Window mode and select your browser from the application list

Step 5. Configure audio capture

  • Enable System audio to record the YouTube video's sound
  • Toggle Microphone on if you want to add commentary
  • Adjust the volume sliders to balance audio levels (I keep system audio at 80% and mic at 70%)

Step 6. Add a webcam if needed

Click the webcam icon to overlay yourself in a corner.

Step 7. Start recording

Click the red REC button or press F10 to get started.

Step 8. Wait for the countdown

A 3-second countdown gives you time to position your browser and catch your breath before your recording starts.

Step 9. Stop recording

Once you are done capturing your content, proceed to press F10 again or click the Stop button in the floating toolbar.

Step 10. Save your video

Once the recording has ended, the clip opens automatically in the built-in editor, where you can trim and export.

Pro tip: I always do a 5-second test recording before capturing anything important. This allows me to confirm my audio sources are working, the capture area is correct, and my computer can handle the recording without lag. I've saved myself from failed recordings countless times with this simple habit.

Pros:
  • Most reliable method with consistent quality across long recordings

  • Complete control over capture area, audio sources, and quality settings

  • Webcam overlay capability adds professionalism to tutorial recordings

  • Built-in editing saves time by eliminating the need for separate software

Cons:
  • Requires software installation and purchase (after trial period)

  • Takes up hard drive space for the application itself

  • Trial versions typically add watermarks to recordings

  • Uses more system resources than lightweight built-in methods

  • Requires some initial setup and configuration

2. Built-in OS screen recording method

Why I picked it: It launches instantly with a keyboard shortcut. Windows Game Bar and macOS Screenshot Toolbar particularly handle most recordings without needing extra software.

This method leverages the screen recording features that come pre-installed on Windows and Mac computers. I discovered this approach when I needed to capture something quickly and didn't have time to open dedicated software. What surprised me was how capable these built-in tools have become over the years; they're no longer basic afterthoughts but legitimate recording solutions.

When I tested Windows Game Bar and macOS Screenshot Toolbar extensively, I found they handle most recording scenarios perfectly well. The most significant advantage is the zero setup time; you simply press a keyboard shortcut, and you're recording within seconds. For quick YouTube captures or situations where you can't install software, this method has saved me multiple times.

User feedback on official support forums shows satisfaction ratings around 4.2-4.3/5, with people appreciating the convenience and integration with the operating system.

Step-by-step instructions for Windows (Game Bar method):

Step 1. Open your browser

Open your browser and navigate to the YouTube video you want to record

Step 2. Open Game Bar

Press Win + G keys to open the Game Bar overlay.

Step 3. Confirm the prompt.

If asked "Do you want to open Game bar?", check Yes, this is a game (works for any window).

Step 4. Start recording

  • Click the circular record button in the Capture widget
  • Or press Win + Alt + R to start recording immediately

Step 5. Monitor your recording

A small timer appears showing recording duration.

Step 6. Stop recording

  • Press Win + Alt + R again
  • Or click the stop button in the floating control bar

Step 7. Find your video

Recordings automatically save to Videos, Captures folder in MP4 format.

Step-by-step instructions for Mac (Screenshot Toolbar method):

Step 1. Open the Screenshot Toolbar

Press Cmd + Shift + 5 keys to open the Screenshot Toolbar.

Step 2. Select recording type

  • Click Record Entire Screen (fourth icon) for full-screen capture
  • Click Record Selected Portion (fifth icon) to manually select your browser area

Step 3. Configure options

  • Click the Options button
  • Under Microphone, select your mic if you want commentary
  • Choose a save location (I use Desktop for easy access)

Step 4. Start recording

Click Record or press Return.

Step 5. Stop recording

Click the stop button in the menu bar when finished.

Step 6. Access your video

The file saves to your chosen location as an MOV file.

Pro tip: For Windows Game Bar, I always check audio settings before recording. To do this, you can click the settings gear icon, Capturing, ensure Record audio when I record a game is enabled. For Mac, the Screenshot Toolbar options menu lets you select your microphone source before starting.

Pros:
  • Zero installation required

  • Instant access via keyboard shortcuts saves time

  • Completely free to use

  • Reliable for recordings under 30 minutes

  • Built-in operating system integration ensures compatibility

Cons:
  • Limited customization options compared to dedicated software

  • Windows Game Bar only records individual windows, not the full desktop

  • No built-in editing capabilities - need separate software

  • Cannot pause and resume recording mid-session

  • No webcam overlay feature

3. Browser extension recording method

Why I picked it: Recording directly from the browser saves time when capturing short clips. Extensions offer the fastest setup, especially if you don’t want to open full recording software.

While exploring this method, I noticed that browser extension recording offers a unique advantage: the ability to capture a YouTube video without ever leaving your browser. I started using this method when I needed to quickly grab short clips without opening separate applications. Extensions like Loom, Awesome Screenshot, and Screencastify run directly in Chrome or Firefox, making them incredibly accessible.

When I tested multiple browser extensions, I found they excel at convenience but have notable limitations. The recordings happen entirely within your browser environment, which means a lighter system load but also restricted functionality. This method works best for quick captures under 10 minutes rather than lengthy recordings.

User reviews on the Chrome Web Store show popular screen recording extensions averaging 4.3-4.6 stars, with users praising the simplicity but noting restrictions on recording length and quality in free versions.

Step-by-step instructions

Step 1. Install a recording extension

  • Go to Chrome Web Store or Firefox Add-ons
  • Search for "screen recorder" (popular options: Loom, Awesome Screenshot)
  • Click Add to Chrome or Add to Firefox
  • Grant necessary permissions when prompted

Step 2. Open a YouTube video

Open the YouTube video you want to record in a new tab.

Step 3. Click the extension icon

Click the extension icon in your browser toolbar (usually the top-right corner).

Step 4. Choose recording mode

  • Tab only records just the current browser tab (best for YouTube)
  • Desktop records your entire screen
  • Some extensions offer Tab + Camera for webcam overlay

Step 5. Select audio source

  • Enable Tab audio to capture the YouTube video sound
  • Toggle Microphone if adding commentary

Step 6. Start recording

Click the Start Recording or Record button. A countdown appears (usually 3 seconds) before recording begins.

Step 7. Record your content

Play the YouTube video.

Step 8. Stop recording

  • Click the extension icon again and hit Stop
  • Or use the keyboard shortcut shown in the extension interface

Step 9. Save or share

  • Most extensions upload to their cloud service automatically
  • Download the video file to your computer if desired

Pro tip: Many free browser extensions limit recording time (5-10 minutes) or add watermarks. I've had recordings cut off unexpectedly at the time limit, so always check the extension's restrictions before starting a long capture.

For Loom specifically: When I use Loom, I appreciate that it generates an instant shareable link after recording. This is perfect when I need to quickly share a YouTube clip with someone, but the automatic cloud upload requires a stable internet connection.

Pros:
  • No installation required. Works directly in the browser.

  • Extremely quick to start

  • Lightweight with minimal system impact

  • Automatic cloud upload means no lost files from computer crashes

  • Instant shareable links for quick collaboration

Cons:
  • Free versions typically have strict time limits (5-10 minutes)

  • Recording quality is often lower than dedicated software

  • Requires a stable internet connection for cloud-based extensions

  • Many add watermarks unless you pay for the premium

  • Browser-based recording can be less stable for long captures

How to record YouTube videos on mobile

4. Mobile screen recording method

Why I picked it: This method is ideal for on-the-go screen recording needs. Moreover, mobile screen recording has become essential for content creators who consume YouTube on phones and tablets.

I extensively tested the built-in recording features on both iOS and Android devices, and I was impressed by how seamlessly they work. This method lets you capture YouTube videos directly on your mobile device without any app installations or complicated setup.

When I'm traveling or away from my computer, mobile screen recording has proven invaluable for saving tutorials, capturing live streams, or recording content for later reference. The quality is surprisingly good - modern phones can record in full HD resolution with clear audio capture.

According to user feedback on official Apple and Google support forums, mobile screen recording features maintain ratings around 4.3-4.5/5, with users appreciating the simplicity and integration with their devices' photo libraries.

Step-by-step instructions for iPhone/iPad (iOS screen recording):

Step 1. Add screen recording to Control Center (one-time setup)

  • Open the Settings app
  • Navigate to Control Center
  • Scroll down to More Controls
  • Tap the green + icon next to Screen Recording.

Step 2. Open Control Center

  • iPhone X and newer: Swipe down from the top-right corner
  • iPhone 8 and earlier: Swipe up from the bottom edge
  • iPad: Swipe down from the top-right corner

Step 3. Long-press the Screen Recording button (circular record icon)

Step 4. Enable microphone audio

  • Tap the microphone icon (turns red when active)
  • This captures both YouTube audio and any commentary you add

Step 5. Tap Start Recording

A 3-second countdown begins. Prepare your YouTube app.

Step 6. Record as needed

The status bar turns red, indicating active recording. Open YouTube and play your video.

Step 7. Stop recording

  • Tap the red status bar at the top
  • Select Stop in the confirmation pop-up
  • Or open Control Center and tap the recording button again

Step 8. Find your video

Automatically saved to Photos app in Recents.

Step-by-step instructions for Android (native screen recorder):

Step 1. Access Quick Settings

  • Swipe down from the top of your screen once
  • Swipe down again to see the full panel

Step 2. Locate the Screen Record tile

  • Look for the Screen Record icon (small screen with a dot)
  • If not visible: tap pencil/edit icon and drag Screen Record to your active tiles

Step 3. Tap Screen Record

Configure recording options in the pop-up:

  • Select Record audio, choose Device audio for YouTube sound
  • Optional: enable Show touches on screen for tutorial-style videos
  • Optional: enable Show taps on screen

Step 4. Tap the Start button

A 3-second countdown gives you time to prepare.

Step 5. Record your content

Open YouTube and navigate to your video.

Step 6. Stop recording

  • Swipe down the notification shade
  • Tap the Stop button in the screen recording notification

Step 7. Access your video

Saved to Gallery in Screenshots or Movies folder.

Pro tip: When I record on mobile, I always ensure I have at least 50% battery power and check available storage first. A 10-minute full HD recording can consume 500MB to 1GB of storage, and I've had recordings fail when my device ran out of space mid-capture.

I've also noticed that using the microphone option sometimes picks up background noise more prominently on mobile than on desktop recording. If you're in a noisy environment, I recommend using headphones or recording in a quieter location.

Pros:
  • No app downloads required

  • Records in full resolution of your device screen (up to 1080p or higher)

  • Captures both system audio and microphone simultaneously

  • No recording length restrictions (limited only by storage)

  • Perfect for capturing YouTube content on the go

  • Completely free with no watermarks or premium features

Cons:
  • Large video files consume significant device storage quickly

  • Battery drain can be substantial during extended recordings

  • Incoming calls or notifications can interrupt recording

  • No built-in editing beyond basic trimming in the Photos app

  • Cannot record certain DRM-protected streaming content

  • Video quality depends on your device's screen resolution

How to choose the best method for YouTube video recording

After testing every major recording method for YouTube videos, I've learned that the best technique depends entirely on your specific situation and needs. For most people, I recommend starting with Movavi Screen Recorder. It provides the perfect balance of professional features and ease of use, and I've relied on it for the majority of my YouTube recordings over the past two years.

When I need something quick and don't have time for software, I use Windows Game Bar (Win + Alt + R) or macOS Screenshot Toolbar (Cmd + Shift + 5). These built-in methods have saved me countless times when I needed to capture something immediately. For mobile recording, the native iOS and Android screen recorders work flawlessly. I've captured dozens of YouTube videos on my phone while traveling with excellent results.

The key lesson from all my testing? Don't overcomplicate the process. Start with the most accessible method for your device, practice with short recordings first, and gradually explore advanced features as you become comfortable. I began with simple screen captures three years ago, and now I confidently handle multi-source recordings with webcam overlays and professional audio mixing.

Whatever method you choose, always do a test recording first. This simple habit has prevented more failed recordings than any other tip I can offer.

Movavi Screen Recorder
The perfect way to record anything from your screen

Disclaimer: Please be aware that Movavi Screen Recorder does not allow capture of copy-protected video and audio streams.

Movavi Screen Recorder

Frequently asked questions

Is there a way to record a YouTube video?

Yes, there are several reliable ways to record YouTube videos. The most effective method in my book is using dedicated screen recording software like Movavi Screen Recorder, which captures both video and audio with professional quality. However, you can also use built-in recording features on your device - Windows Game Bar (Win + Alt + R), macOS Screenshot Toolbar (Cmd + Shift + 5), or mobile screen recorders on iOS and Android.

How do I save videos from YouTube?

You can save YouTube videos using two main approaches: screen recording or downloading. For screen recording, you can use any method described in this article; start by capturing your screen while the YouTube video plays to create your own recording file. This approach is legal for personal use under fair use provisions.

For downloading, YouTube Premium subscribers can save videos within the YouTube app for offline viewing. Third-party download tools and websites exist, but be aware that downloading copyrighted content without permission violates YouTube's Terms of Service. I recommend screen recording because it's clearly legal for fair use purposes like education, commentary, or review, and it captures exactly what you see, including any on-screen elements or reactions you want to include.

How many views on YouTube do you need to make $1000?

Based on current YouTube monetization rates, you typically need between 300,000 to 500,000 views to earn $1000, though this varies significantly based on your content niche, audience location, and ad engagement rates. In any case, YouTube's CPM (cost per thousand views) generally ranges from $2 to $10, with some niches like finance and technology earning higher rates. Meanwhile, it is also important to note that viewer engagement and watch time matter more than raw view counts. Videos with longer watch times and higher engagement earn substantially more per view.

What is the 7-second rule on YouTube?

The 7-second rule on YouTube refers to the critical window at the start of your video when you must capture viewers' attention before they click away. YouTube analytics show that the first 7 seconds have the highest drop-off rate, so successful creators use this time to immediately hook viewers with compelling visuals, an intriguing question, or a preview of what's coming. When I analyzed my own YouTube videos, I noticed that videos with a strong hook had 40% higher retention than those with slow introductions.

Have questions?
Have questions?
If you can’t find the answer to your question, please feel free to contact our Support Team.
Join us for discounts, editing tips, and content ideas

1.5M+ users already subscribed to our newsletter

By signing up, I agree to receive marketing emails from Movavi and agree to Movavi's Privacy Policy.