Step 1. Extract and open the audio in Adobe® Audition®
Import your audio from the video into Adobe® Audition®. This specialized video noise reduction tool will open the audio waveform automatically.

How to Remove Background Noise from Audio and Video [4 Easy Ways]
To remove background noise from audio, follow these simple steps:
Download and launch Movavi Video Editor.
Upload media files.
Adjust noise reduction settings and save the result.
By clicking the download button, you're downloading a trial version of the program.*

How to remove background noise from video: 4 best ways
If you’ve ever recorded video or audio, you’re probably all too familiar with the problem of background noise. Whether you’re making a family movie or recording a street interview using a microphone, the resulting footage will likely contain unwanted sounds: breathing, random voices, traffic noise, and other ambient sounds, or various hums and buzzes caused by mic defects.
If you find your video or audio has unwanted background noise, there’s no need to throw your work into the garbage. There’s plenty of audio noise reduction software on the Internet! In this article, we’ll cover the three most common ways to remove background noise from video and audio: using a desktop video editor, audio-editing program, and online audio noise reduction tool.

When selecting products to include in our reviews, we research both demand and popularity.
All products mentioned in this article have been tested by Movavi Content Team.
When testing, we compare key parameters, including video and audio trimming, visual effects, stabilization, video quality adjustments, saving and sharing videos, and other significant features.
We study user reviews from popular review platforms and make use of this information when writing our product reviews.
We collect feedback from our users and analyze their opinions of Movavi software as well as products from other companies.
How to remove background noise from video using Adobe® Audition® – 3 Steps
Step 1. Extract and open the audio in Adobe® Audition®
Import your audio from the video into Adobe® Audition®. This specialized video noise reduction tool will open the audio waveform automatically.
Step 2. Capture a Noise Print and reduce the noise
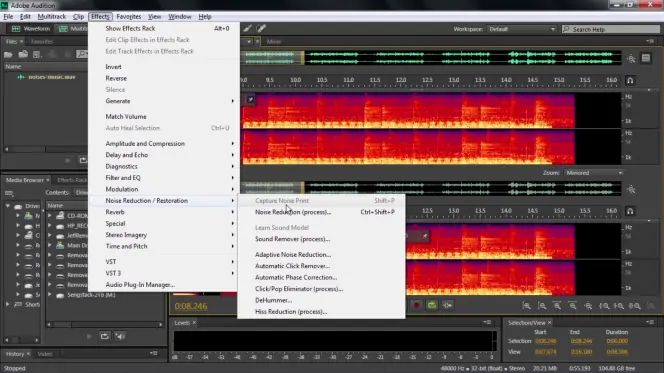
Step 3. Save and re-sync the cleaned audio to your video
Export the cleaned audio file from Audition®, then return to your video editor and replace the original audio with the cleaned version. Re-sync the clip and export your final video with clear, noise-free sound.
How to remove background noise from video using Movavi Video Editor – 3 steps
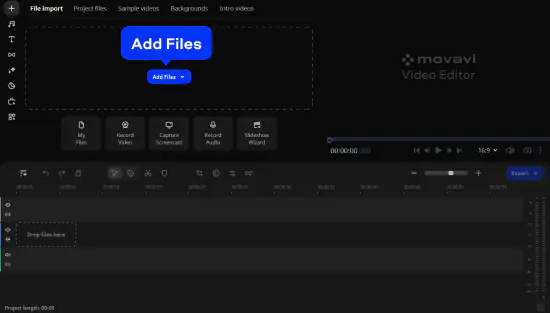
Step 1. Import your video
Open Movavi Video Editor and click Add Files (or drag your video in). The video and its audio track will appear on the timeline.
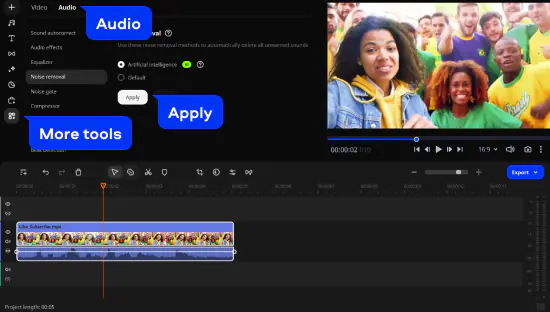
Step 2. Apply noise removal
Select the video or audio track, open More Tools, go to Audio, choose Noise Removal. Use the Default option and then the Noise suppression slider or choose the automatic AI Noise Removal to reduce background noise until the voice sounds clean and natural. Click either Apply or Reset in order to change the method of video noise reduction.
Step 3. Export the cleaned video
Click Export, choose your preferred format (e.g., MP4), and press Start to save the video with the improved audio.

How to remove background noise from video using Audacity – 3 steps
Step 1. Extract and import your video’s audio into Audacity
Export the audio track from your video using any video editor. Then open Audacity and import the audio via File, Import, Audio.
Step 2. Capture a Noise Profile and apply Noise Reduction
Find a short section where only the background noise is audible. Select it, go to Effect, Noise Reduction, Get Noise Profile. Next, press Ctrl+A / Cmd+A to select the entire audio, return to Effect, Noise Reduction, adjust the settings, preview the result, and click OK to reduce the noise.

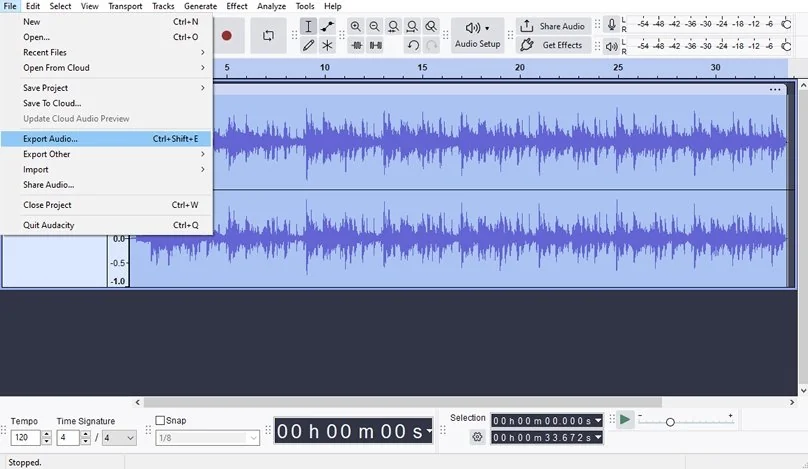
Step 3. Export the cleaned audio and re-sync it with your video
Go to File, Export Audio and save your cleaned file. Open your video editor again, replace the original noisy track with the cleaned version, sync it to the video, and export your final project.
How to remove background noise from video using AudioDenoise.com – 3 steps
Step 1. Upload your video file
Go to AudioDenoise.com and upload your video to this background noise remover for free by clicking the upload area or dragging the file onto the page. The site accepts common formats such as MP4 and MOV.
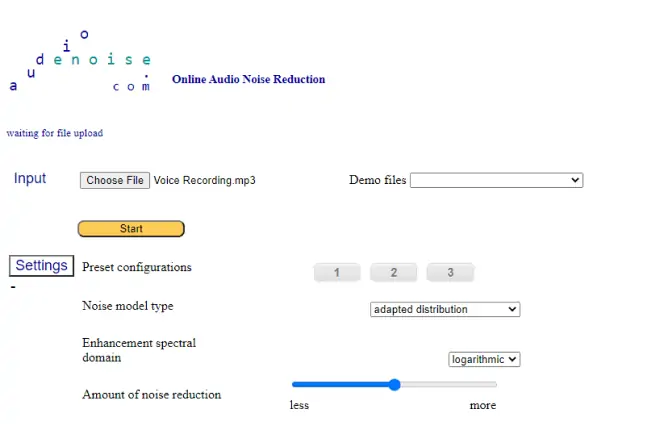
Step 2. Start the noise reduction
Click Start Noise Reduction. The website will upload your video, process the audio with its default noise-removal settings, and then show two players:
Listen to the cleaned version. If needed, adjust the denoising settings and press Process to improve the result.
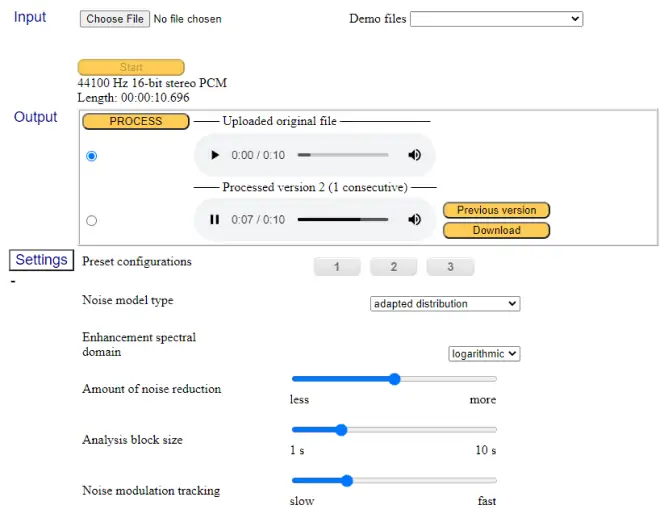
Step 3. Download your cleaned audio or video
Once you’re satisfied with the noise reduction, press Download under the cleaned audio player. Re-sync the cleaned audio with your video in your editor or use the processed video file if provided.
Best for Adobe® eco-system users: Adobe® Audition®
Best for newbies with first-time projects: Movavi Video Editor
Best for plugin support: Audacity
*The free version of Movavi Video Editor may have the following restrictions depending on the build: watermark on exported clips, 60-second video or 1/2 audio length limit, and/or some advanced features unavailable when exporting videos.

Frequently asked questions
To remove background noise from a video, you need to use software or online tools designed for audio cleanup. Here are some options you can use:
To remove background noise from a video on Android or iPhone, you’ll need to extract the audio, clean it with a noise-reduction tool, and then attach the cleaned audio back to the video. This requires two steps: processing the audio separately and then recombining it with the video.
To reduce noise using Lexis Audio Editor, first convert or extract your video’s audio into an MP3 or WAV file and open it in the app. Tap the menu icon (three dots), choose Effects, and select Noise Reduction. The background noise removal app will load the noise-reduction tool, where you can use the default settings or manually adjust options like Threshold and Rate to fine-tune the cleanup. When ready, tap Apply to process the audio. While removing the noise you can adjust the percentage of noise reduction to avoid distortion, and then listen to the cleaned audio to make sure the speech remains clear. Save the processed file to your device.
To add the cleaned audio back to your video, open a mobile video editor such as Movavi Clips, import the original video, mute its original audio track, and insert the cleaned audio file. Export the new video with the improved sound quality.
To remove background noise from a recording using Movavi Video Editor, simply open the program and import your audio or video file, then select the track on the timeline and open More Tools, go to Audio, and choose Noise Removal. You can use the standard Noise suppression slider in the Default option or switch to AI Noise Removal to let the software clean the audio automatically. Adjust the noise reduction level until the unwanted background sounds fade while the voice remains natural. Once you’re satisfied with how it sounds, click Apply and then export your cleaned recording.


1.5M+ users already subscribed to our newsletter