How to Take a Screenshot on Chromebook with Keyboard Shortcuts

  • Capture everything, not just your browser tabs
  • Highlight keystrokes and mouse actions
  • Draw on videos in real time

Free online screen recorder

  • Webcam
  • Microphone
  • Sound
  • Watermark

Supported browsers: Google Chrome, Mozilla Firefox, Microsoft Edge, Opera

Edited by
Ben Jacklin
10436

Key takeaways

  • LightShot and Screshot provide extra control and annotation options beyond built-in shortcuts.
  • Keyboard shortcuts work instantly on Chrome OS and require no apps. They suit quick captures of forms, tabs, or notes.
  • Quick settings and stylus options give flexibility on tablets or touchscreen Chromebooks.
  • Desktop screen recorders fill the gap when video recording or full desktop capture is needed without installation.
  • Check your download locations. Screenshots might land in the Clipboard, Tote, or Files app, depending on your method.

Chromebooks look simple, but sometimes they behave like they actively resist screenshots. I once mashed every key on my HP Chromebook, hoping some secret combo would save me from manually cropping a full-page PDF. Spoiler: it didn’t. Lenovo, Dell, Asus — same story. You’ve probably stared at the screen, wondering how to take a screenshot on your Chromebook.

I tested every tool making waves in software circles. Keyboard shortcuts, browser extensions, lightweight apps, full editors. Some felt clunky. Others ran smoothly but missed features I needed. Hours of trial later, I built a list of platforms that actually deliver.

This guide shows step-by-step how to take a screenshot on a Chromebook with keyboard shortcuts, downloadable apps, and online tools. By the end, you’ll have a list of tried-and-true software. You won’t waste time guessing which one to use in your own screen-capturing projects.

My top picks

  • Best free tool: keyboard shortcuts. Zero install, instant, offline-friendly.
  • Best for browser use: LightShot. Edit and share quickly inside Chrome.
  • Best for collaboration: Awesome Screenshot. Integrates with Slack, Trello, Google Drive.

How do I take a screenshot on my Chromebook?

Tool

OS

Why I picked it

Read more

Keyboard Shortcuts

Chrome OS

Instant capture, no extra software needed

LightShot

Windows/macOS, Chrome, Firefox

Quick edits and uploads directly from the browser

Awesome Screenshot

Chrome OS, Windows, Mac

Combines screenshots + recordings with annotations

1. Keyboard shortcuts for screenshots

  • OS:

    Chrome OS

Why I picked it: instant capture, no apps needed

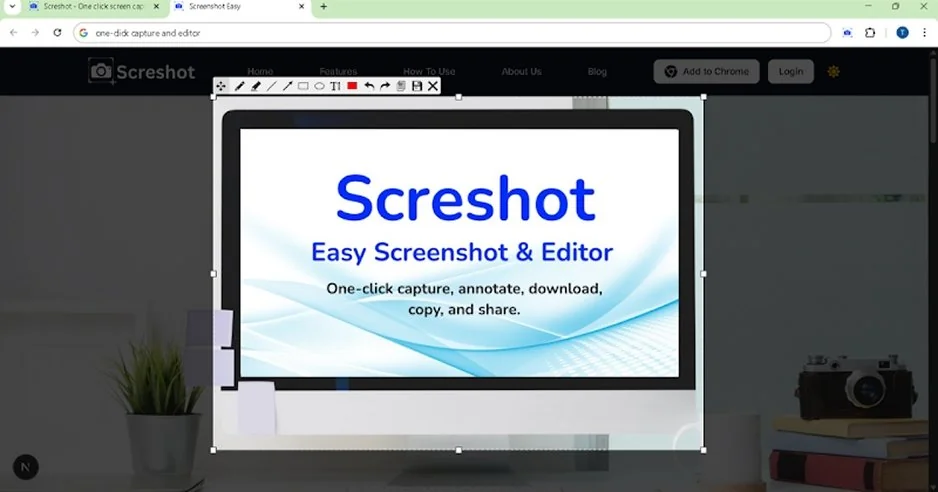
How can I answer “how do I take a screenshot on my Chromebook” properly without touching the built-in utilities? Let’s fix it right now!

So, the built-in keyboard tool lets you capture the full screen or a selected area instantly. ChromeOS offers a “Screen Capture” tool that also handles screen recordings and basic screenshot options. Once you capture, the image lands automatically in the Downloads folder, or you can copy it to the clipboard to paste somewhere.

Keyboard shortcuts for quick print screen are our everything! I use the shortcuts to clip sections of guides I’m writing. Sometimes I capture a full window for reference or notes. When deadlines hit, I save forms and receipts fast, without opening any extra software.

And that’s how to take a screenshot on Chromebook with a keyboard in seconds, no extra tools needed. Reliable, fast, and easy.

Step-by-step instructions:

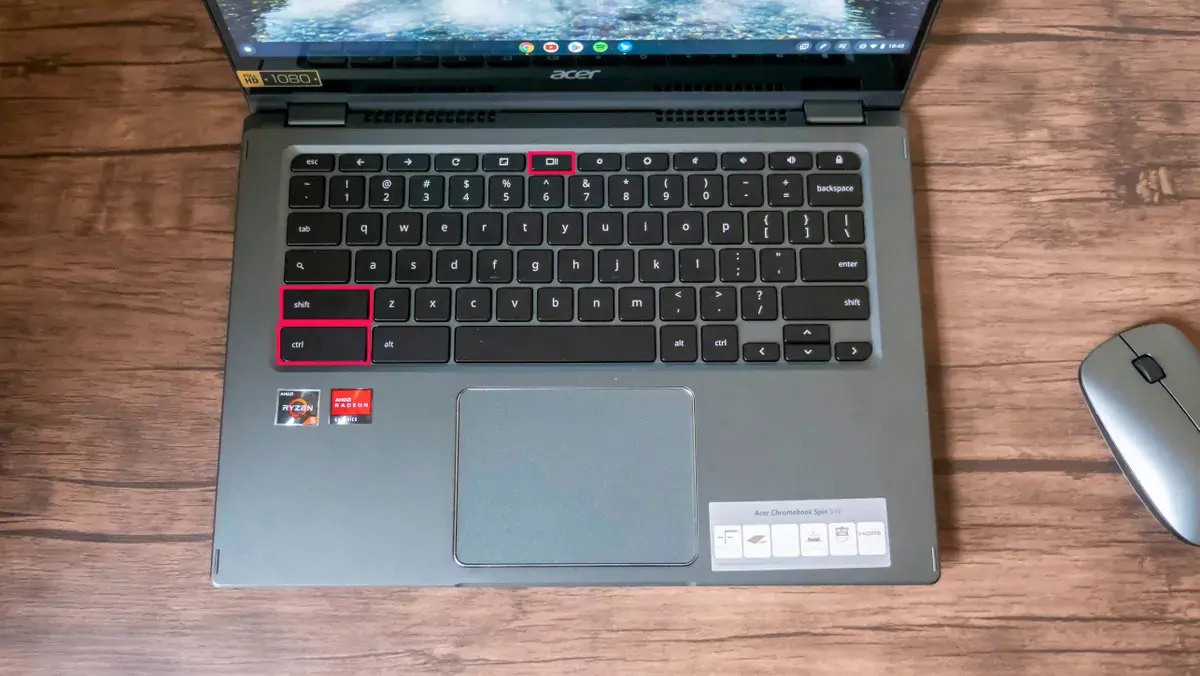
  1. Press Ctrl + Show Windows key to capture the full screen.
  2. Press Ctrl + Shift + Show Windows key to grab a custom area.
  3. Click and drag to mark the section you need.
  4. Release the keys or the mouse to take the screenshot.
  5. Open Downloads to access the image or paste it directly with Ctrl + V.
Pros:
  • Works instantly with the keyboard alone

  • No installation required

  • Offline-friendly

Cons:
  • Limited annotation tools

  • No automatic cloud backup

  • Video capture options remain basic

Quick capture without remembering shortcuts

Don’t want to memorize Ctrl + Show Windows? No problem. Click the time on your Chromebook’s taskbar to open Quick Settings. Tap Screen Capture, and a small toolbar pops up. From there, you can grab a full screen, a single window, or just a section. Video recording works the same way; switch modes with the button on the left.

Tablet mode tips

Some Chromebooks don’t have a keyboard. On tablets, press Power + Volume Down to capture the entire screen instantly.

Stylus tricks for partial screenshots

If your Chromebook supports a stylus, hit the Pen icon on the shelf. Choose Capture Region, drag the stylus over the area you want, then lift it to snap the screenshot. Works great for clipping sections of notes or diagrams.

Where to find your screenshots

Screenshots land in the Clipboard first, which holds the last five items. Press Search + V to check them. You can also use the Tote on the shelf for quick access. Anything older? Open the Files app: screenshots sit in Images, recordings in Videos.

  • OS:

    Windows/macOS, Chrome, Firefox, IE & Opera

Why I picked it: quick editing right after capture, no extra hassle

Very simple, yet very powerful, Lightshot is a universal tool available for Windows/Mac, Chrome, Firefox, IE & Opera. Download for free and let it work its magic! It lets you select any area on your screen and snap it immediately. You can add text, arrows, and simple shapes directly on the screenshot. After capturing, images can be saved locally, copied to the clipboard, or shared online. It also provides a search function to find similar images instantly.

How was my work with Lightshot? I used it to capture specific parts of web pages for a project presentation. While checking layouts and design elements, I quickly added notes and arrows to highlight key points. For the tutorial I was putting together, it let me show step-by-step details clearly, without needing any extra software.

Step-by-step instructions:

  1. Click the Lightshot icon on your Chrome toolbar.
  2. Drag to select the area you want to capture.
  3. Use the tools on the pop-up bar to annotate if needed.
  4. Click the disk icon to save, or the copy icon to paste elsewhere.

Ratings

4.7/5

Pros:
  • Fast selection and editing

  • Easy sharing online

  • Lightweight and simple

Cons:
  • No video capture

  • Limited advanced editing

  • Requires browser extension

  • OS:

    Chrome OS, Windows, macOS, Chrome and Firefox extensions

Why I picked it: I can capture and explain in one go, no switching apps

This tiny tool contains huge capabilities! A browser extension, Awesome Screenshot manages screenshots and screen recordings in a single interface. You can grab a full page, a window, or a selected area. Add text, arrows, or shapes instantly. Record your screen and webcam together, with system audio or microphone sound. Share directly to Google Drive, Slack, Trello, or save locally. It keeps everything organized in the cloud if you want.

For my workflow, I use it when I need to clarify a process quickly. Recording a short tutorial or highlighting a bug works better than writing paragraphs. When preparing materials for teammates, I annotate screenshots directly, so everyone sees exactly what I mean.

Step-by-step instructions:

  1. Click the Awesome Screenshot icon in your browser or desktop app.
  2. Select Screenshot or Screen Recorder mode.
  3. Pick the area, window, or page you need.
  4. Add annotations if needed.
  5. Save locally or share instantly through cloud links or apps.

Ratings

Pros:
  • Screenshots and video recording in one tool

  • Quick annotation and sharing

  • Works with popular collaboration platforms

Cons:
  • The free version limits some recording time

  • Some advanced editing requires other software

  • A browser extension is needed for full functionality

Quick summary

  1. Best for instant screenshots without extra software: Keyboard shortcuts

  2. Best for quick edits and sharing: Lightshot

  3. Best for showing a process or explaining steps: Awesome Screenshot & Screen Recorder

  • OS:

    Windows, macOS, Chrome, Firefox

Why I picked it: needed full web pages without leaving the browser

Another interesting tool that answers the question “How do I take a screenshot on my Chromebook?” – FireShot. It captures entire web pages, visible parts, or a selection. You can save images locally without an internet connection.

The built-in editor lets you crop, highlight, blur, or annotate right after capture. Batch mode works across multiple tabs. Export options include PDF, PNG, JPEG, GIF, or BMP. Directly send screenshots to OneNote, email, or upload via FTP.

When I use FireShot, I focus on web documentation. I grab full tutorials, annotate steps for clarity, and archive receipts or forms for reference. Bug reports get marked with arrows and text, then sent to colleagues immediately. Occasionally, I take snapshots of video frames for guides or training materials.

Step-by-step instructions:

  1. Click the FireShot icon in your browser toolbar.
  2. Choose a full page, visible area, or a selection.
  3. Use the editor to add arrows, text, or blur sensitive info.
  4. Save as PDF or image, or export to OneNote or email.

Ratings

Pros:
  • Full-page capture inside the browser

  • Quick annotation and editing

  • Batch capture and multi-tab support

Cons:
  • No screen recording

  • Advanced options require Pro

  • Only works on supported browsers

  • OS:

    Chrome extension

Why I picked it: needed a tool to grab web content fast and keep it organized

FuseBase grabs almost anything from web pages: text, images, links, PDFs, even emails. You can add notes before saving. Everything goes straight to your FuseBase account. Offline access works, so your clippings are ready even without the internet. You can highlight, annotate, or remove unwanted clutter before storing. The extension handles multiple file types and keeps things tidy across devices.

For my projects, I use FuseBase to collect research and examples. When writing tutorials, I clip text and images from multiple sources, add quick notes, and organize them by project. I also store emails and attachments for reference without leaving the browser. Occasionally, I grab PDFs or article sections to annotate for training guides.

Step-by-step instructions:

  1. Install the FuseBase extension in Chrome.
  2. Click the icon in the toolbar.
  3. Select the full page, a section, PDF, or email.
  4. Add highlights, notes, or annotations if needed.
  5. Save directly to your folder for later access.
Pros:
  • Clips text, images, PDFs, and emails

  • Notes and highlights before saving

  • Access content offline

Cons:
  • Requires a FuseBase account

  • Only works in Chrome

  • Some advanced PDF features need Pro

  • OS:

    Chrome extension

Why I picked it: one click to grab what I need and edit it immediately.

This is the final tool in the Chromebook screen-print series. It answers the question of how to screenshot on Google Chromebook efficiently, keeping everything fast and in one place. Screshot captures screens with a single click. You can select a full page, visible area, or a custom region. It comes with simple annotation tools: text, arrows, shapes, blur, and cropping. Screenshots save instantly to your device or clipboard for quick sharing. No extra apps, no setup, no delays. Performance stays smooth, and the interface stays clean. Sharing links is coming soon, making collaboration even faster.

I can sometimes rely on Screshot when I need fast, focused screenshots for notes or documentation. Sometimes I clip small areas to include in emails or chat messages. Other times, I capture entire pages to save references or instructions for later. The annotation tools let me mark what’s important without switching programs.

Step-by-step instructions:

  1. Add the Screshot extension to Chrome.
  2. Click the icon in the toolbar.
  3. Choose a full page, visible area, or custom region.
  4. Annotate using text, arrows, blur, or crop.
  5. Save to your device or copy to the clipboard.

Ratings

Pros:
  • One-click capture and edit

  • Copy instantly or download

  • Clean, fast interface

Cons:
  • Limited sharing until new updates

  • Only works in Chrome

  • Fewer advanced editing options compared to full editors

I set this one aside in its own slot. It doesn’t replace a Chromebook screenshot tool, but fills a gap: when you need full‑screen or video captures (or quick shareable screencasts) without installing anything.

When I switch between devices, maybe a HP laptop or a Lenovo desktop, or even a quick Windows rig, this online recorder works. No setup fuss. If I want to show a workflow, record a meeting, or capture a full‑screen bug with audio, I just open the browser and record.

Conclusion

So, now you know how to screen capture on a Chromebook. Screenshots on a Chromebook don’t always behave. Keyboard shortcuts grab a full screen or a section in an instant, no setup needed. Lightshot and Awesome Screenshot worked best when I wanted to mark details or add quick notes. Each tool suits a different task: speed, clarity, or extra context. Having a few of these on hand made my workflow smoother, and I could pick the right one depending on what the moment demanded.

Movavi Screen Recorder
The perfect way to record anything from your screen

Disclaimer: Please be aware that Movavi Screen Recorder does not allow capture of copy-protected video and audio streams.

Movavi Screen Recorder

Frequently asked questions

How do I take a screenshot in Chromebook with a keyboard?

Just press Ctrl + Show Windows. The screen snaps instantly. Want just a part? Add Shift, drag over the area, and release. Done. Simple, no apps needed.

How do I take a screenshot on Google Chrome?

Use the keyboard shortcuts or grab a Chrome extension like Lightshot. Click the icon, select your area, and save. Works whether it’s a full page or just a section.

What does Ctrl + Alt + Z do on a Chromebook?

It turns on ChromeVox, the screen reader. You’ll hear your screen read aloud. Handy if you need it, confusing if you hit it by mistake.

How do I do a full screenshot on Chromebook?

Ctrl + Show Windows captures everything on your screen. The file lands in Downloads instantly. From there, open, share, or edit it as you like.

Have questions?
Have questions?
If you can’t find the answer to your question, please feel free to contact our Support Team.
Join us for discounts, editing tips, and content ideas

1.5M+ users already subscribed to our newsletter

By signing up, I agree to receive marketing emails from Movavi and agree to Movavi's Privacy Policy.