
Here, we’ll show you how to take a screenshot with Movavi ScreenShot step by step.

The 17 Best Chrome Screenshot Extensions
Here are some of the best Chrome screenshot extensions:
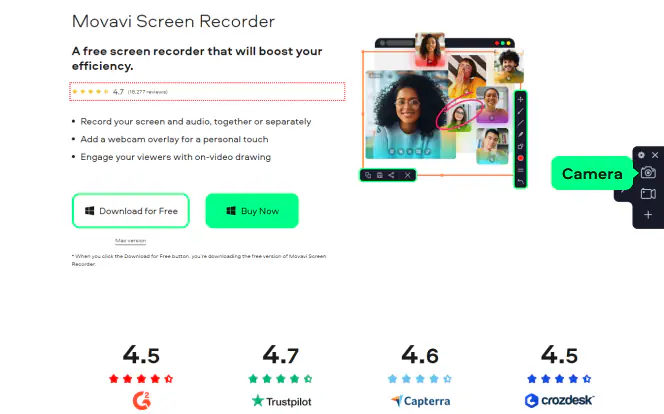
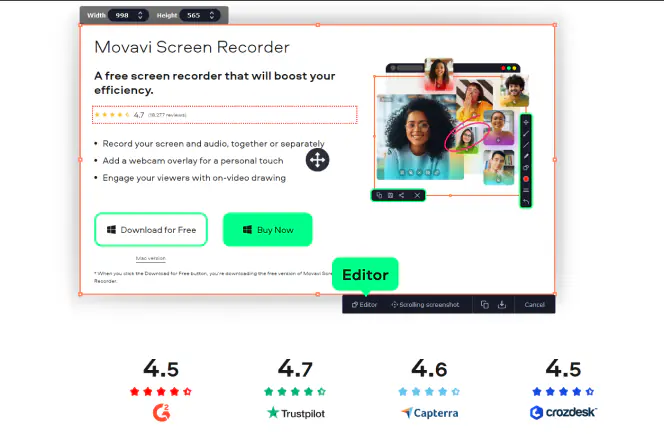
Try a desktop screenshot app – Movavi Screen Recorder.
Looking for screenshot tools? Let's have a look at the 17 best Chrome screenshot extensions!
Special pick: Movavi Screen Recorder
Want to capture your screen easily and take scrolling screenshots? As an alternative to a screenshot Chrome extension, try Movavi Screen Recorder – a fully-featured desktop tool for everyone who wants to create screenshots, annotate them, and then share them with friends and colleagues.
Take a screenshot of your entire screen, window, or a portion of the screen. Use arrows, shapes, and text in the Editor mode. Share the result by simply copying to clipboard or download on your computer.
Best screenshot extensions for Chrome
Best for: taking screenshots in one click
Google Web Store rating: 4.2 out of 5 stars
One of the best screen capture extensions for Chrome is Movavi ScreenShot. This tool can grab your screen at multiple sizes: Chrome full page screenshots, specific parts of the screen, or full screen, including all open tabs. Browser frames are excluded from the image.
It’s so easy to use that even new users will quickly understand how to take a screenshot. You will appreciate the simplicity and the high quality of the images.
The default format for screenshots is JPG. You should save the screencap to your desktop, then you can convert it to any format and share it with your colleagues or friends.
Features:
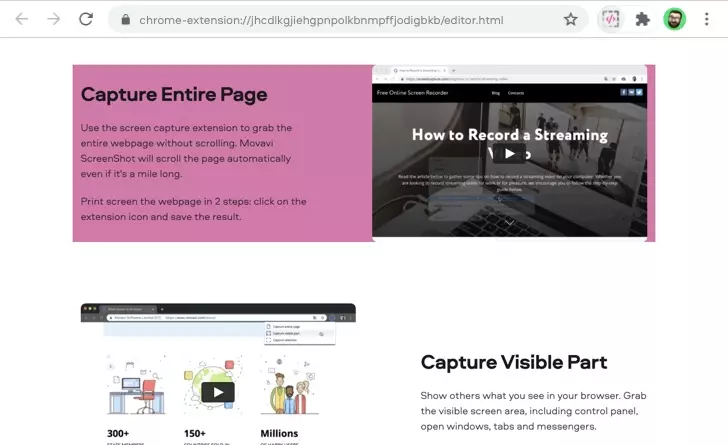
- Screenshot of the entire page. You can capture the entire webpage without scrolling. Movavi ScreenShot will scroll the page automatically, even if it's a mile long.
- Screengrab of the visible part. Show others what you can see in your browser. Grab the visible screen area, including control panel, open windows, tabs, and messengers.
- Screencap of a selected area. Frame the area you want to capture. This way, you won’t have to crop the image later to cut out unwanted parts.
Pros:
- Requires no special permissions for installation.
- Can be used in incognito mode.
- Supports free downloading of Chrome screenshots.
Cons:
- No editing tools
- No direct link to share screenshots via social networks
2. GoFullPage
Best for: taking a full-page screenshot
Google Web Store rating: 4.9 out of 5 stars
Users: 5,000,000+
GoFullPage is one of the simplest extensions for making a full-page screencap. You can click on the icon or use the shortcut Alt+Shift+P. The image will appear in a new tab, where you can download it. The app offers several formats for downloading, including PNG, JPEG, and PDF.

Features:
- Full-page screenshot
Pros:
- Quick and easy to use
- Free installation
- Multiple image formats
- No limitations on page length
Cons:
- Just one size of screenshot
- No built-in editing tools
- No direct link for sharing the screencap
3. Awesome Screenshot
Best for: sharing screenshots and screen recordings with colleagues
Google Web Store rating: 4.6 out of 5 stars
Users: 2,000,000+
Awesome Screenshot is a multifunctional plugin that takes screenshots and records your screen activity. It offers a wide range of features, listed below.
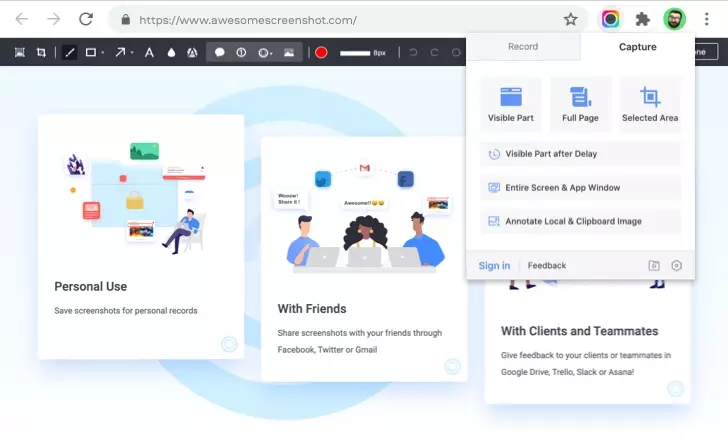
Screen recording features:
- Records your desktop, current tab, or camera only.
- Includes your voice in recording with the microphone option on.
- Generates a shareable link for a video after finishing recording.
- Supports sharing recordings via Jira, Slack, Trello, Asana, GitHub.
Screenshotting features:
- Offers different sizes of screenshots: full page, selected area, or visible area.
- Has simple editing tools: annotations, text, cropping, blur effect, etc.
- Supports copying a screenshot directly when screenshotting selected areas for quick pasting.
Pros:
- Many functions in one app
- Ability to share content with colleagues
Cons:
- To get a shareable link, you need to register on the Awesome Screenshot official website.
- It takes time to set up the capture parameters.
- It’s not easy for new users to understand the interface at first glance.
- The app does not always work correctly, possibly due to a large number of functions.
4. Nimbus Screenshot & Screen Video Recorder
Best for: making screencasts
Google Web Store rating: 4.6 out of 5 stars
Users: 2,000,000+
Nimbus Screenshot & Screen Video Recorder is the perfect tool for creating screencasts. Besides standard recording and screenshotting functions, it has many features that any blogger will appreciate! For instance, you can add your own watermark to a screenshot or video to brand it. Let’s see what the extension offers more.
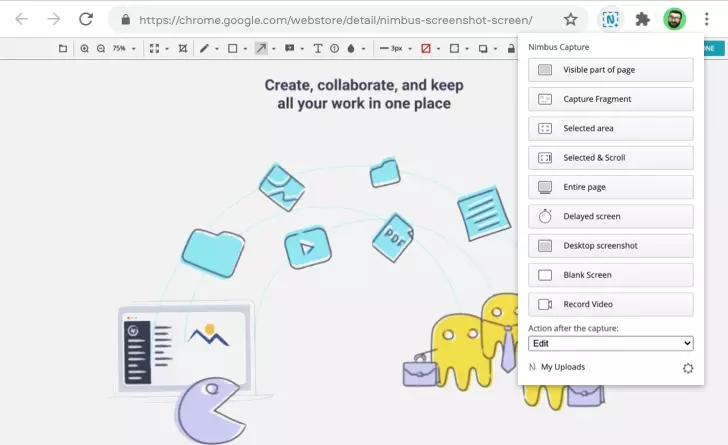
Screen recording features:
- Records video from your screen and webcam.
- Supports annotations.
- Supports customizing video resolution and frame rate.
- Premium package offers advanced editing features.
- Supports publishing videos on YouTube (Premium package).
- Converts video to GIF.
Screenshotting features:
- Captures the entire window or any part of it.
- Offers standard editing tools such as cropping, trimming, highlighting text, adding arrows and stickers.
- Supports saving images directly to cloud storage.
Pros:
- Advanced settings for screencasting
- Free for installation (basic features)
Cons:
- To use the coolest features and advanced editing tools, you need to buy the Premium package.
- It takes more time to take a screenshot than with a simple screenshot extension.
5. FireShot
Best for: capturing all tabs in one click
Google Web Store rating: 4.7 out of 5 stars
Users: 3,000,000+
Though FireShot doesn’t have a particularly modern interface design, it does have everything you need to make a simple screen capture.
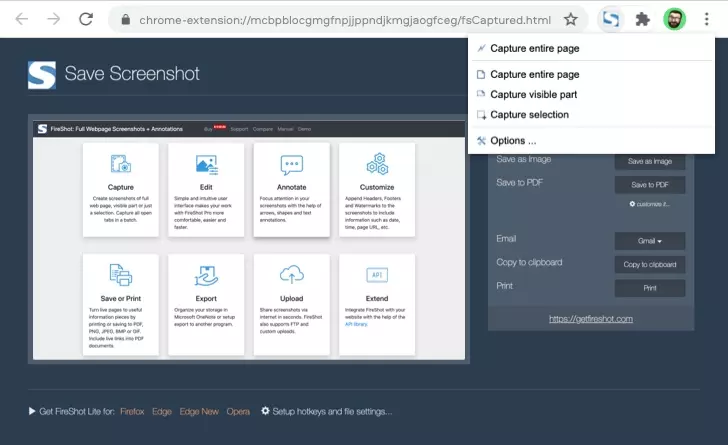
Features:
- Captures screen at multiple sizes.
- Creates a screenshot of all opened tabs in one click.
- Supports attaching screenshots to Gmail, copying them to the clipboard or sending images directly to the printer.
- Supports different formats for saving: PNG, GIF, JPEG, BMP.
- Has standard editing tools.
Pros:
- Quick sharing without registering on the website
- Multi-functionality
- Works offline
Cons:
- Takes a long time to get to your required setting.
- Has an unattractive interface.
6. Bubbles
Best for: team work
Google Web Store rating: 4.8 out of 5 stars
Bubbles is a Chrome Store screen capture tool that is a great option if you’re working on a team project. You can generate a private link to your screenshots so that only your team members can see the images and recordings.
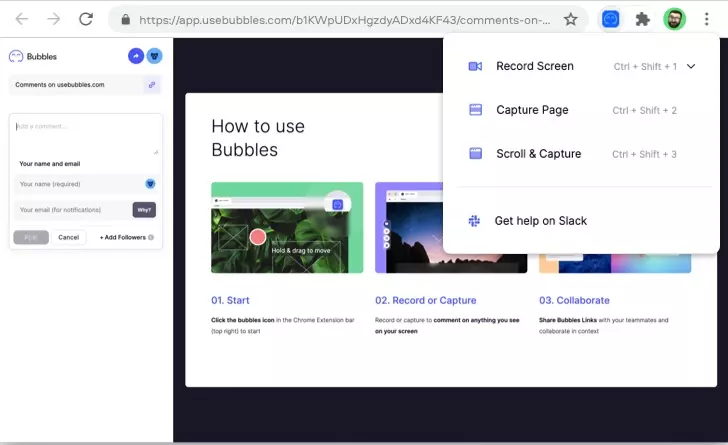
Features:
- Records your screen activity.
- Takes screenshots.
- Supports adding text or audio comments to your recordings.
Pros:
- Convenient sharing with team members
- Simple interface
- Fast screenshotting
Cons:
- No opportunity to customize the size of screenshots
- No system audio recording
- No webcam recording
7. Snippyly
Best for: online collaboration
Google Web Store rating: 4.7 out of 5 stars
The next on our list of the best Chrome screenshot extensions is Snippyly. This tool is perfect for real-time collaboration. Why? It supports not only sharing screencaps but also generating edit-access links. You make a screenshot – your colleagues add comments to it. Easy and interactive project discussion is here!
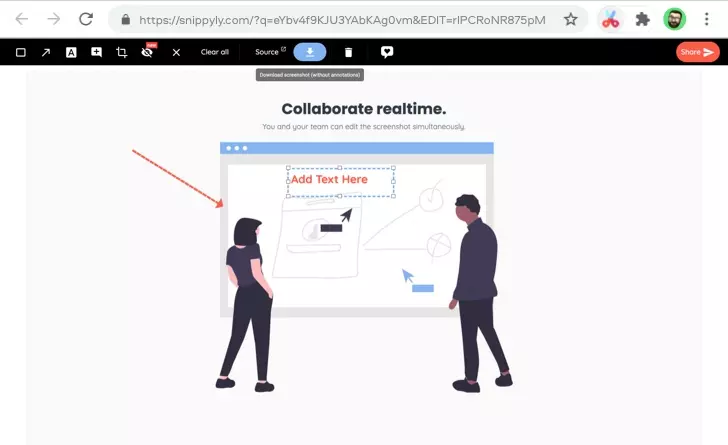
Features:
- Takes screenshots of the current webpage.
- Has simple editing tools such as graphics and annotations.
- Promotes online sharing via a view-access or edit-access link.
Pros:
- It’s easier to collaborate with colleagues in real time.
- You can customize screenshotting shortcuts.
- You don’t need to register on the website to generate sharing links. Snippyly saves your screencaps to its storage anonymously.
Cons:
- No choice of image size
- No link for downloading screenshots to the desktop
8. Screenshot YouTube
Best for: taking screenshots on YouTube
Google Web Store rating: 4.5 out of 5 stars
If you want to take screenshots of YouTube videos in one click, check this app out. It’s one of the simplest and fastest tools you can find on the internet.
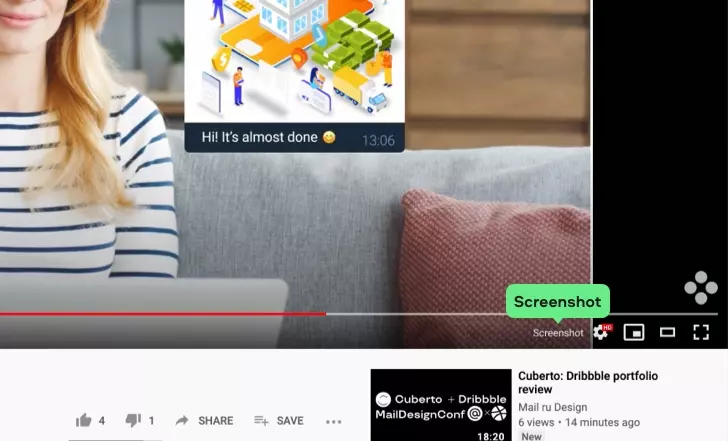
Features:
- Takes screenshots of YouTube videos.
Pros:
- Fast and easy to use
- No browser frames in your screenshot – just the video image
- The option to save the file to the clipboard
Cons:
- Poor functionality – only YouTube video screencaps
- No editing tools
9. Pikaso
Best for: screenshotting and sharing tweets
Google Web Store rating: 3.8 out of 5 stars
This addon is specifically for making Twitter screenshots. You can grab any tweet and share it via social networks.
Features:
- Tweet screenshotting
Pros:
- You can take clutter-free Twitter screenshots.
- It’s possible to share screenshots via Instagram, websites, and newsletters.
Cons:
- Very specific and narrow functionality
- Only for Twitter users
- No editing tools
- To use the extension, you have to sign in to the official Pikaso website.
10. HTML Elements Screenshot
Best for: taking screenshots of particular HTML elements
Google Web Store rating: 4.6 out of 5 stars
Are you a developer or designer? Then this extension is for you. It supports grabbing screencaps of HTML elements, so you don’t need to cut them out of a full-page screenshot.
Features:
- HTML element screenshotting
- Full page screenshotting
Pros:
- Great for designers, developers, and QA engineers.
- Requires no trimming.
- Allows customizing screenshot size.
- Free for installation.
Cons:
- No option to take a screenshot of a selected area if it includes multiple HTML elements
- No editing tools
- No sharing options
11. Droplr
Best for: making emoji-driven screenshots
Google Web Store rating: 4.1 out of 5 stars
Droplr takes screenshots and makes screen video recordings like many extensions. But it has one feature that sets it apart from the others – emojis! Yes, you can add emotions to your screenshots and make them funnier.
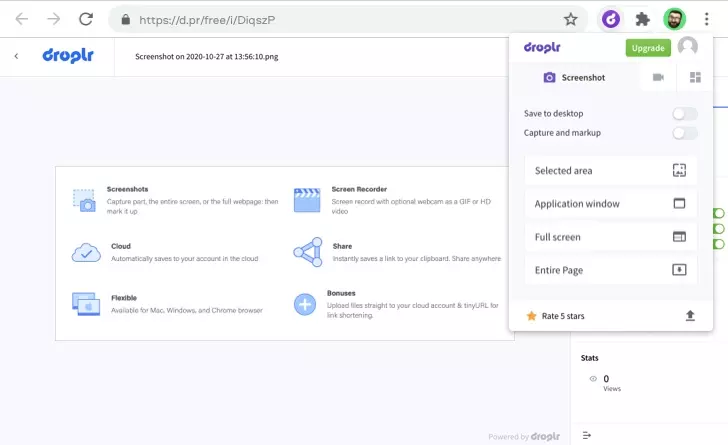
Features:
- Takes screenshots at multiple sizes: part of your screen, the entire screen, application window, or just a simple page screencap.
- Has simple editing tools, including emojis.
- Records screen, audio, and webcam.
- Supports converting screen recordings to GIF.
Pros:
- Multi-functionality
- Simple interface
- The option to save screenshots to your clipboard
Cons:
- To use the app, you need to register on the website.
- You cannot download screenshots to your desktop.
12. Blipshot
Best for: saving a screenshot with the page name, date, and time
Google Web Store rating: 3.8 out of 5 stars
Blipshot makes full-page screenshots. It works quickly and saves files with the page name, date, and time.
Features:
- Makes a full-page screenshot, not just the visible area.
- Has drag’n’drop saving option.
Pros:
- Fast and easy to use
- Files are saved with date and time
Cons:
- If the page is too large, it may crash Chrome when you drag'n'drop the image onto your desktop.
- It doesn’t work correctly if you change the size of the Chrome window.
- There is no support for screenshot size options.
13. Standardized Screenshot
Best for: adding a drop shadow to screenshots
Google Web Store rating: 3.5 out of 5 stars
Standardized Screenshot is a simple tool for screenshotting current tabs. Additionally, you can add a drop shadow to your screencaps or even a macOS-style title bar.
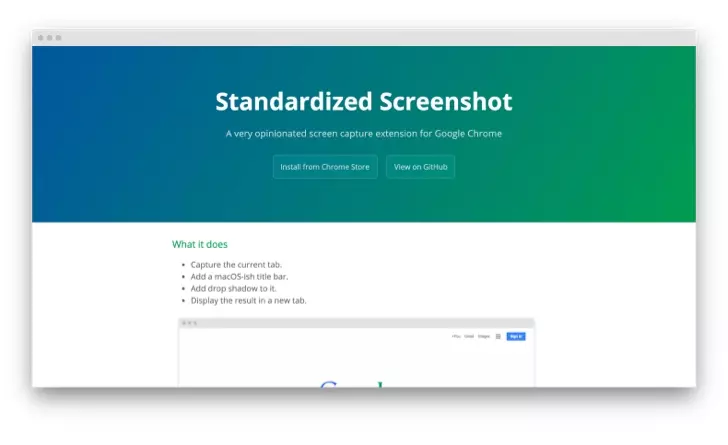
Features:
- Captures the current tab.
- Supports adding drop shadows to your screencaps.
Pros:
- Free for installation
- Easy to use
Cons:
- Limited functionality
- No option to change screenshot sizes
- No editing tools
- No sharing options
14. Askify
Best for: enhancing note-taking on online presentations and courses
Google web store rating: 3.5 out of 5 stars
While Askify is a capable tool for screen capture in Chrome, its real value lies in its ability to save multiple screenshots in a single document. Essentially, Askify is more of a note-taking assistant than a pure screenshot tool. Askify is best suited for users looking for a quick and easy tool to help them grab more detailed notes on the fly when watching online presentations, training sessions, and academic classes.
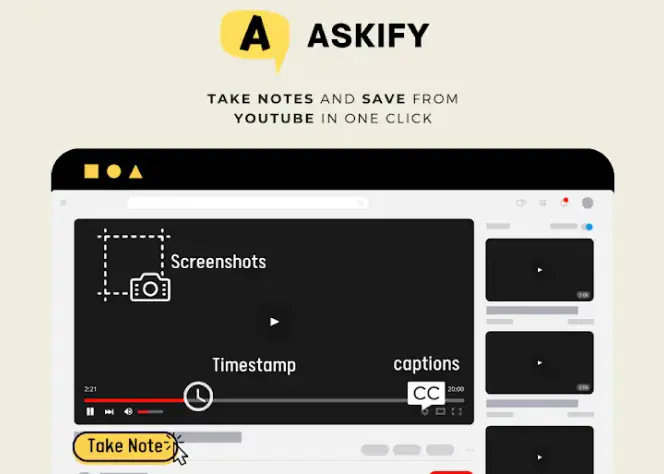
Features:
- Automated notes
- Full video transcripts
- Automatic screenshots and audio notes
- Transparent image editor
Pros:
- User-friendly interface
- Comprehensive note-taking features
- Integration with Google Suite
Cons:
- Users report glitches with exported notes
- Issues with timestamps on export videos
- Lacks a highlighting feature
15. NinjaCapture
Best for: easy sharing for collaborative projects
Google web store rating: 4.7 out of 5 stars
NinjaCapture is a screenshot plugin for Chrome with an emphasis on sharing and collaboration. It includes tools that allow users to quickly annotate screenshots and add helpful notes where necessary. Sharing screenshots is a quick and easy process with NinjaCapture, making it a good option for teams that use screenshots to communicate and collaborate on projects and presentations.
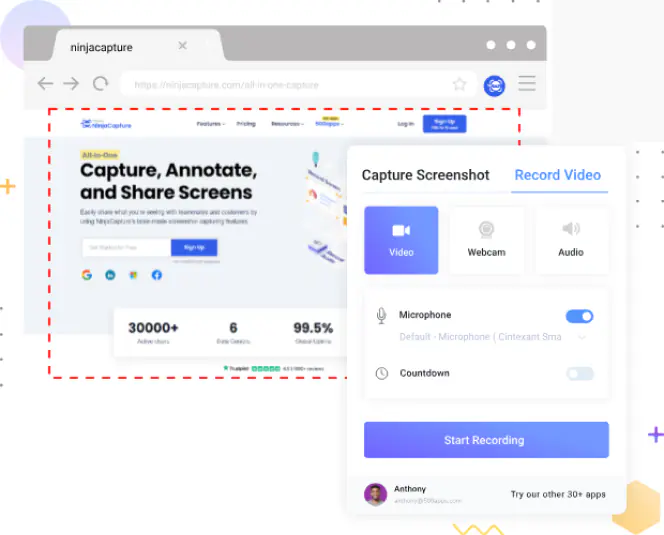
Features:
- Screen capture and annotation capabilities
- Delayed screenshot feature
- Microphone audio recording
- Customizable frame rates on video recordings
Pros:
- Intuitive interface
- Useful drawing tool
- Fast screenshots
Cons:
- Requires users to create a 500apps account
- Some users report glitches with screenshot downloads
16. Usersnap
Best for: UI and UX design, development, and testing
Google web store rating: 4.7 out of 5 stars
Usersnap is a Chrome extension that allows users to give feedback and report bugs on websites in Chrome. Usersnap is great for UX and UI testing teams to capture specific instances of areas for improvement, UX details that work really well, and glitches that need to be fixed ASAP. It’s a highly useful tool for design and development teams, and works well for external user experience testing, as well.
Features:
- Integrations with multiple collaboration and project management tools (including Slack, Jira, and Zapier)
- In-browser screenshots
- Collaboration and communication tools
- Metadata analysis
Pros:
- Easily launch and share testing pages
- Easy installation and implementation
- Great feedback tool for clients and external testers
Cons:
- Annotation location may not line up with appropriate visual process
- Expensive compared with other screenshot tools
17. Loom
Best for: quick collaboration for businesses and internal teams
Google web store rating: 4.7 out of 5 stars
Loom is a video communication program designed to help businesses improve collaboration. It has screenshot capabilities, with note-taking functionality. It also includes features that allow users to create and share videos, and teams can then give feedback directly in those videos. While Loom works as a screenshot app, it’s primarily designed to help teams reduce the need for meetings and calls while improving communication efficiency.

Features:
- Screen and webcam image capture and video recording
- Microphone and system audio capture
- Online video hosting
- Direct sharing to LinkedIn, Twitter, and the Google Search index
Pros:
- Easy, seamless screen recording
- Simple editing features
- Fast screenshot and video uploads
Cons:
- Unresponsive customer service
- Issues with Loom’s cloud storage solution
- Inaccurate captioning
How to use Movavi’s screen capture extension for Chrome
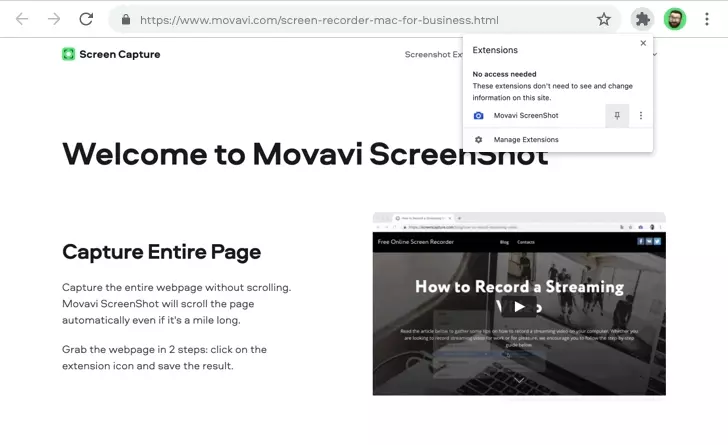
Step 1. Install the extension
Follow the link below and click Add to Chrome.
Then, pin the screenshot icon in the top right corner of your browser.
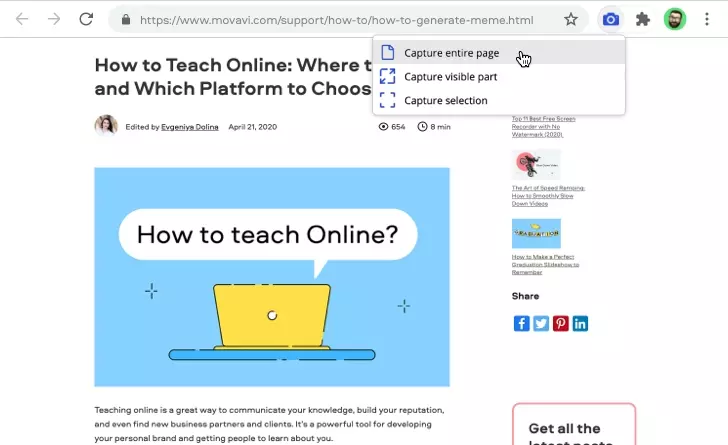
Step 2. Select the capture area
Open the website that you want to screenshot. Click on the extension icon and select the appropriate option. You can choose to capture a certain area of the web page, its visible part, or the whole page.
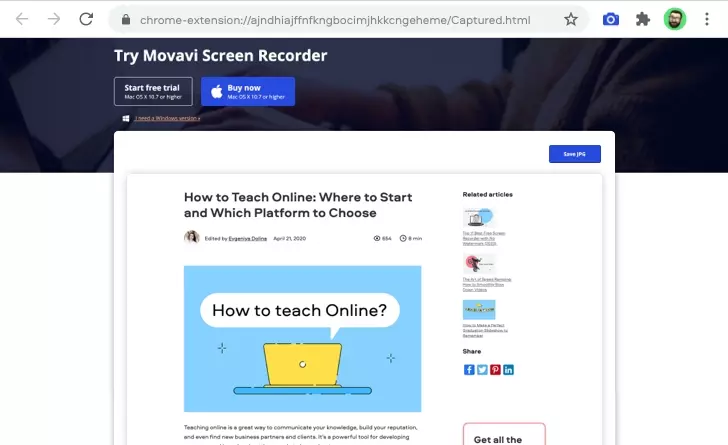
Step 3. Save the screenshot
A new tab with the screenshot will open. To download the image to your computer, click Save JPG and indicate the folder where you want to save the file.
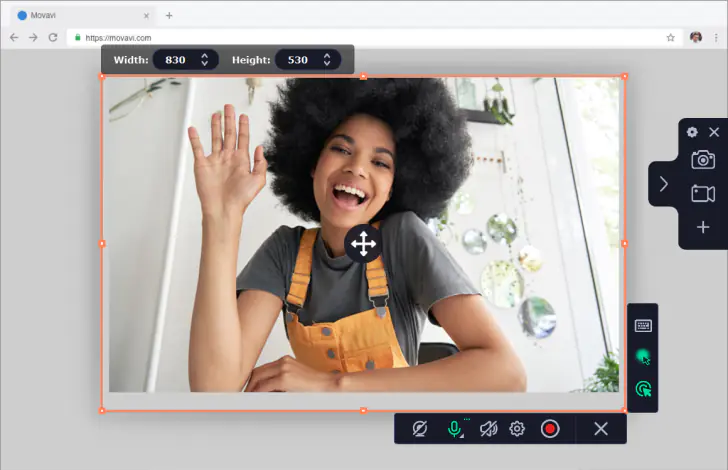
How to take Chrome screenshots with Movavi Screen Recorder
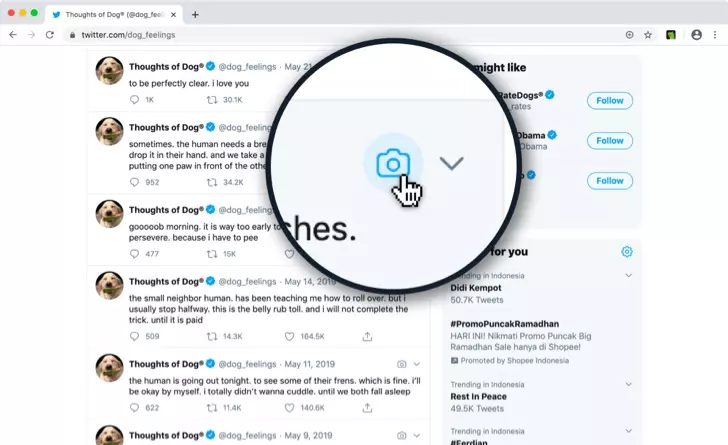
Step 2. Select the screenshot tool to capture a still image
At the bottom right corner of the window, you’ll see the recording toolbar. Here, you’ll find several icons to help you choose your recording or screen capture parameters. Click on the Camera icon to select Movavi Screen Recorder’s screenshot mode.
Step 3. Set your screenshot parameters to capture a browser window
When you select the screenshot functionality, your cursor will change shape to become a crosshair. You can now take one of several types of screenshots (full screen, partial screen, or window). To capture a Chrome browser window, hover over the window you want to screenshot. When a frame appears, click to capture the window. Alternatively, if you only want to capture part of the browser screen, you can click and drag your mouse across the area of your screen that you want to capture. For a full-screen screenshot, you can just click on any empty area of your desktop.
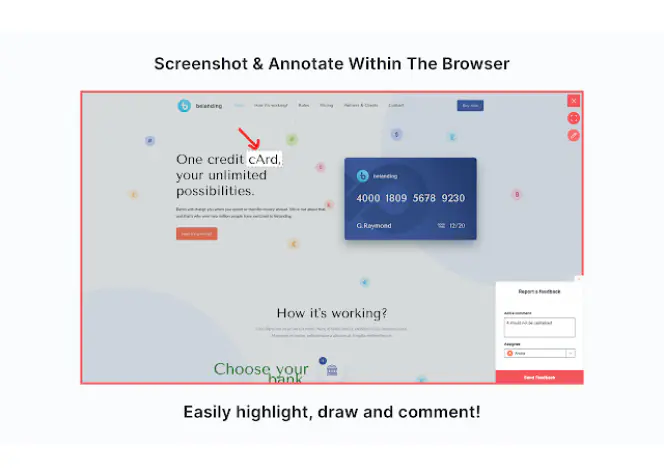
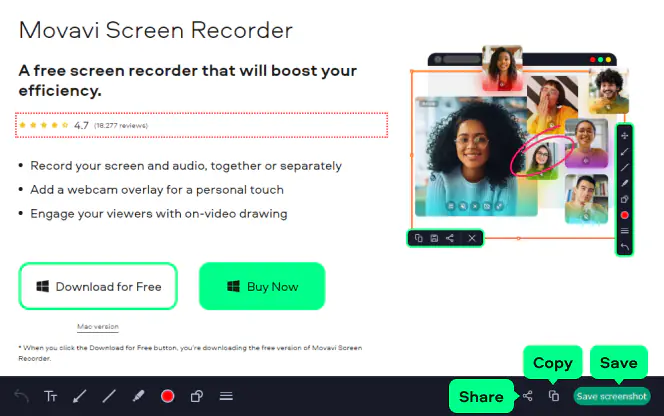
Step 4. Edit your screenshot (optional)
After you take a screenshot of your Chrome window, a frame will appear around your screenshot. Once this frame appears, you’ll be able to make edits to your screenshot in Movavi. You can enhance the image by changing its size and/or shape, and by adjusting its colors. If you’re giving feedback on a project, you can add arrows and annotations to easily communicate with your team. If you’re taking notes or you want to call out a specific area for an online presentation, you can highlight text or images in the screenshot, among other enhancements. When you’re done editing, all that’s left is to save your image.
Step 5. Copy, save, or share your Chrome screenshot
Finally, you just need to choose how you want to save or share your screenshot. You can click the Copy button to copy the image and paste it into a document, presentation, or spreadsheet. You can click Save to choose your image file format and then export and save your image to your computer. Or, you can click Share to share your image online via Google Drive or another platform.
Which Chrome extension to choose?
There are plenty of screenshot extensions, and it might be hard to choose one among this variety. Here’s what we recommend to consider when choosing a screenshotting tool.
Features: While all screenshot extensions have the same basic function of capturing the screen, they have different additional features. Pay attention to the capture options – not all extensions can capture the whole page or a select part of the screen. You also might need drawing tools to add some notes on your screenshot.
Ease of use: Some extensions require just one click to take a screenshot. So if one tool is not that easy to use, you can always choose an extension with a simpler interface.
Reviews: Check out user reviews before using a tool. This way, you’ll learn about the advantages of the program and potential problems.
Summary
Choosing the right Chrome print screen extension for you is easy if you’re certain about what functionality you need. For a fully-featured desktop program, try Movavi Screen Recorder. This app allows you to take screenshots (scrolling ones included), annotate them, and share them in a blink of an eye.
Frequently asked questions
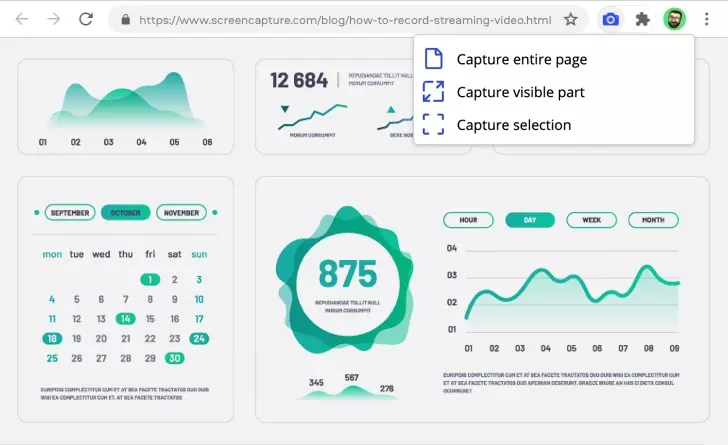
How do you take a full-page screenshot in Chrome?
How do you take a full-page screenshot in Chrome?
To take a full-page screenshot, follow these steps.
- Install Movavi ScreenShot Extension. The icon will appear in your browser automatically.
- Choose the Capture entire page icon – it’s the first option on the size list.
- Open the page you want to grab and hit the icon to launch the screenshot capture process. Movavi ScreenShot will scroll the page and capture it automatically.
- When the capture is complete, you’ll see the result in a new tab. If you’re satisfied with the image, click Save JPG.
How do I screenshot a full page in Chrome without an extension?
How do I screenshot a full page in Chrome without an extension?
You can use developer tools if you don’t want to install an extension.
- Open Developer Tools by clicking on the three dots on the top right corner of your browser.
- Go to the Device tab.
- Customize the size of the screenshot. You can choose any width and height or select one of the default options.
- Take the screenshot and save it to your desktop.
How can I add a screenshot extension to Chrome?
How can I add a screenshot extension to Chrome?
- Go to the Chrome Web Store.
- Search for a screenshot extension. You can choose one of the extensions that we’ve described in this article, for example, Movavi ScreenShot Extension.
- Click Add to Chrome. The screenshot icon will appear in the top right corner of your browser.
Is there a Chrome extension for screenshots?
Is there a Chrome extension for screenshots?
Yes, Movavi ScreenShot is an easy-to-use extension available for free in the Chrome Store. It enables users to choose from multiple types of screenshots of their browser tab or window, including scrolling screenshots of long webpages.
How do I take a high-quality screenshot in Chrome?
How do I take a high-quality screenshot in Chrome?
Taking a high-quality screenshot in Chrome is easy. With Movavi Screen Recorder, you can take a high-resolution screenshot and make any edits you need right in the app. To capture your screen in Chrome with Movavi, follow these steps:
- Download, install, and launch Movavi Screen Recorder.
- Click on the screenshot tool (camera icon) to capture still images.
- Hover your cursor (which should now look like a crosshair) over the window you want to capture.
- When a frame appears, click on the window, and the tool will automatically capture a screenshot of the selected window.
- Make any edits to the image you want in Movavi Screen Recorder.
- Save, copy, or share your screenshot.
What is the snip tool extension for Chrome?
What is the snip tool extension for Chrome?
The snipping tool extension is a Chrome browser extension that enables users to capture screenshots of webpages in Chrome. With this extension, users can capture all or part of a browser window, and it also includes some photo editing features.
How do you take a screenshot on Chrome?
How do you take a screenshot on Chrome?
You can take a screenshot on Chrome by downloading and using Movavi Screen Recorder. To take a screenshot of part or all of a webpage in Chrome with Movavi, follow these steps:
- Download Movavi Screen Recorder and follow the installation prompts.
- Open Movavi Screen Recorder and click on the camera icon to select the program’s screenshot mode.
- To capture your Chrome window, hover over the window with your mouse and wait for a frame to appear.
- Once the frame appears, click anywhere on the browser window to capture your screenshot.
- Edit your screenshot and add any annotations or enhancements with Movavi Screen Recorder’s editing tools.
- Copy, save, or share your screenshot.
Is Awesome Screenshot safe?
Is Awesome Screenshot safe?
There have been reports that Awesome Screenshot may have malware in its code. This malicious code is designed to access sensitive user data, including web browsing history. Even if malware is not present, Awesome Screenshot does include adware, which may capture user information.

Have questions?
If you can’t find the answer to your question, please feel free to contact our Support Team.
Join us for discounts, editing tips, and content ideas


1.5M+ users already subscribed to our newsletter