How to Screen Record on a Mac with Audio [6 Easy Ways]

Try Movavi Screen Recorder:

  • Microphone and system sound recording
  • Capture video and audio separately
  • Recording scheduler
Edited by Ben Jacklin
8 925

Wondering how to screen record on a Mac with audio? Luckily, there are a lot of tools that can help you record your screen with sound. You can try our online screen recorder right away or explore other options below.

Software

Best for

Platform

Download

Easy desktop recordings with extra tools, like editing

Windows, Mac

Online recordings with no software download

Browser-based

Recording and playing video files with a built-in software

Mac

We've got six different methods for people who want to know how to record screen and audio at the same time on a Mac, including an online Mac screen recorder with audio, some built-in software, and desktop programs to make screen capture with audio on a Mac. We'll show you that it's easy to record video and audio from a screen on a Mac.

Read our article on how to screen record on a Mac with audio and discover some simple step-by-step guides to capture whatever you need.

How to record screen on a Mac with audio using Movavi Screen Recorder

Best for desktop recordings

Rating: 4.5/5 stars, 49 reviews

One of the best ways to record your screen with audio on a Mac is to use Movavi Screen Recorder. It’s a desktop app designed with both beginner and intermediate users in mind. You can use it to record all kinds of content, including games, streams, lectures, webinars, video calls, and more.

Movavi Screen Recorder is a good choice for many Mac users due to its ease of use and the unique features it has to offer. The features include a recording scheduler, the option to show keystrokes and mouse clicks, webcam capture, audio-only capture, the ability to draw on your videos, and more. See the steps below to find out how to screen record with sound on a Mac using Movavi Screen Recorder.

Step 1. Download and install Movavi Screen Recorder

The first step to using Movavi Screen Recorder to record your screen and audio at the same time on a Mac is to download the program from the official Movavi site. Once the file is downloaded, you can open it up and install it, following the on-screen instructions to guide you through the process.

Step 2. Open the program

Once Movavi Screen Recorder is installed on your Mac and you're ready to record, simply open it up. You should see a little widget appear on the screen. This is the Screen Recorder. It has simple Record and Screenshot buttons, as well as some options you can adjust. The program will be able to record anything on your screen, so it's wise to get whatever you want to record ready to go in a separate window.

Step 3. Configure the settings

Before you start recording, it's important to get everything set up correctly to get the best results for your recording. First, press the Screen recording button, shaped like a movie camera, to access the settings. You'll first need to either click on the window you want to record or click and drag a box to cover the space you want to record, which can be either the entire screen or just part of the screen. Next, it's time to set up the audio. You should see Microphone and System Audio buttons on the menu. You can click on each one to turn them on or off for the recording. There are also other buttons that let you adjust whether or not mouseclicks and keystrokes are shown on your screen recording.

Step 4. Record your screen

Once you've got all the settings sorted out with Movavi Screen Recorder, you can click on the REC button to start recording your screen with audio. The program will give you a small countdown timer before it starts to let you know when the recording has begun, and you can then proceed to use your Mac as normal, with the screen recorder running in the background and capturing everything that appears. This will continue until you're ready to stop. You can stop with the Stop button, and then you can make some simple edits to your recording, if needed, and save it to your Mac.

Great! Now you know how to record screen on a Mac with audio using Movavi Screen Recorder.

Online tool for screen recording on a Mac with audio

Best for online recordings

Rating: 4.7/5 stars, 440 reviews

If you want a simple and convenient method to record video and audio on Mac OSX or any computer, Screen Capture is the tool you need. Screen Capture is a free online screen recorder that runs directly in your browser. All of the screen recordings you make with Screen Capture are private and secure, available only to the creator, and ready to download directly to your device once you've finished recording. The recordings are made in HD quality, so you can see every detail. You can also record your webcam and your voice using the microphone capture.

Let's explore how to screen record on a Mac with audio using Screen Capture.

Step 1. Open Screen Capture

The first step of using Screen Capture to record your Mac screen with sound is to visit the official Screen Capture page. Since this is an online tool, you can simply load it up in a browser of your choice, like Chrome, Firefox, or Opera. You don't need to do any downloading or installing of any apps or software to get started.

Step 2. Configure the settings

The next step is to configure the settings of Screen Capture to suit your needs for recording your Mac screen and audio. This is a really simple free online screen recorder, so it doesn't have too many options, and new or inexperienced users shouldn't have anything to worry about. You simply need to tick the various boxes to decide whether you want to include or exclude your microphone or webcam from the recording. By default, if you're using the free version, a watermark will also appear on your recordings, but you can remove this if you pay for the premium version of Screen Capture.

Step 3. Grant permission

Once you've got the settings of Screen Capture figured out, you can click on the big, green button that says Start Recording. This will take you to a new page, where your browser will ask you for permission to access your microphone or webcam if you want them included in the recording, as well as asking for permission to record your screen and letting you choose which window you want to start recording. You'll need to click on the Allow button to grant permission to the browser to start recording. Otherwise, it won't be able to record anything at all.

Step 4. Record your screen

The next step to using Screen Capture, once you've granted permission, is to simply allow the recording process to continue. This online tool can allow you to record your screen however you like, switching between apps and windows and recording all of the necessary information for your videos. Everything is private and secure, and all recordings are saved in HD and on secure servers with private access just for you.

Step 5. Stop and save when you're finished

When you're finished recording your Mac screen with audio via Screen Capture, you can simply press the button to stop the process and then save the recording to your Mac.

How to screen record with sound with VideoProc Recorder

Best for computer screen recordings

Rating: 4.3/5 stars, 292 reviews

VideoProc Recorder is one of the functions in VideoProc Converter – an all-in-one video toolbox that gathers a recorder, downloader, converter, and editor. Speaking of it’s recorder, it can help you to record any computer screen, picture-in-picture videos, and a iPhone screen. You can choose the output file format, edit recordings, apply green screen (only if you want to change the video background), crop the recording area, mark the recordings, etc.

To make a new screen recording with audio using VideoProc Recorder, follow the steps below.

Step 1: Launch VideoProc Converter and select Recorder on the main interface.

Step 2: Select a recording mode.

Step 3: Click on the wheel-shaped icon in the top-right corner to set up recording settings.

Step 4: Choose to record the entire screen or part of the screen.

Step 5: Click on the REC button to start recording. When everything is OK, click on the Stop button to end.

Download VideoProc Recorder

How to record screen with audio on a Mac using QuickTime

Best for recording with a built-in software

Does Mac have a built-in screen recorder? Yes, you can QuickTime for screen recording on your Mac. The app comes preinstalled on macOS devices, such as MacBook Air or MacBook Pro.

However, there is a catch. One of the issues with using QuickTime Player is that it doesn't actually support the capture of system audio. It can be used to record external audio from your microphone, but it won't work with the usual system sounds. Fortunately, there is a workaround for this problem, and it involves downloading and installing Soundflower. It’s an open-source extension for Mac devices that basically gives QuickTime access to system sounds.

Read the guide below to see how to screen record on a Mac with audio using QuickTime.

Step 1. Download and install Soundflower

One of the benefits of using QuickTime to record the screen of your Mac with audio is that the software itself is built right into your device by default. So you won't need to download QuickTime, but you do need to download and set up the Soundflower extension in order to be able to record audio with your screen. Make sure to download it from a reputable site. It should come in the form of a zip file that can be extracted and run on your system. You may need to grant permission for the installation by going to the System Preferences menu, then clicking on Security and Privacy, and clicking the Allow button for the software. You may also need to restart your Mac to finish the installation process.

Step 2. Configure the audio devices

Soundflower is an extension that reroutes your system audio, but you need to set it up correctly in order to get the right results when using QuickTime to capture your screen. To do this, head back to the System Preferences section of your Mac and then enter the Sound settings menu. Click on Output. This should show a list of available output devices for your Mac's audio. Soundflower should appear as an entry in the list. There should be two Soundflower items: Soundflower (2ch) and Soundflower (64ch). Beginner users should select the Soundflower (2ch) option, and this is the simplest.

Step 3. Open QuickTime and configure the settings

After setting up Soundflower, you're ready to load up QuickTime and get ready to start recording. But first, you need to make sure that the QuickTime settings are correctly configured to get the results you want. To do this, open QuickTime and click on File. Then click on New Screen Recording. A window should appear with a Record button, ready to let you capture your screen. Before clicking Record, click on the Options button to the right side of the window. Ensure that your Microphone is set as Soundflower (2ch). This is what will allow QuickTime to record system audio rather than audio from your mic. You can also use the Options menu to adjust the quality of your recording and choose whether to show or hide mouse clicks.

Step 4. Start your recording

After setting up all of the settings and the Soundflower extension, you can go ahead and click on the Record button to start capturing your screen. At this point, a box might appear asking you for permission to start recording, so you might need to click to allow this and then click the Record button again if the process hasn't started automatically. QuickTime will also offer you the choice between full-screen recording or partial screen recording. If you choose full screen, there's no need to do anything else. If you choose a partial screen, you'll need to click and drag a box around the area of the screen you want to capture. Once you do this, the recording process will start.

Step 5. Stop and save

Once you're done recording your Mac screen with QuickTime, you can press the Stop button. The app will then stop the recording and save your file to your device, where you can view, edit, and share it as desired. After finishing the process, you may also want to head back into the System Preferences menus and set your audio output back to the default. Otherwise, your system sounds won't be heard.

How to record screen and audio at the same time on a Mac using hotkeys

Best for quick screen recording

A fast way to record your screen is to use hotkeys. This option is available for users of Mac OS Mojave and later. Using shortcuts is convenient since you don’t need to install any software. Let’s see how to record screen with audio using Mac hotkeys.

Step 1. Open the toolbar

To open the recording toolbar, press Command + Shift + 5.

Step 2. Select the area for capture

Depending on what part of the screen you want to record, select Record Entire Screen or click Record Selected Portion.

Step 3. Set the recording parameters

Click Options to open the menu of recording parameters. You can specify where to save your file and what audio source to capture.

Step 4. Record your screen

Hit Record to start recording. When you’ve recorded everything you need, click the Stop button.

How to use a Mac screen recorder with audio in Chrome

Best for recording in the Chrome browser

Another simple way to record your screen with audio is to use a browser extension. Check out Movavi Screen Recorder for Chrome. This tool makes it easy to record a certain browser tab or an entire screen. You can record tab sound and microphone audio as well as capture your webcam.

Here’s how to record screen with audio using Movavi Screen Recorder for Chrome.

Step 1. Add the extension to Chrome

Open the extension page and click Add to Chrome. Then pin the extension in your browser for quick access.

Get Movavi Screen Recorder for Chrome

Step 2. Set the capture parameters

Click the extension icon and select the desired options for recording. Pick Current Tab or Entire Screen depending on what you need to record. Then activate the appropriate sound capture options – Record Tab Sound and Record Voice. The Embed Webcam option is also available. For the first time use, you’ll need to grant access to your microphone and webcam.

Step 3. Record your screen

Hit Start Recording and then click Stop when needed.

Step 4. Save your recording

Now, you can preview your recording. If everything’s OK, click Download. The video will be saved to your computer in the MP4 format.

How to choose a screen recorder with audio

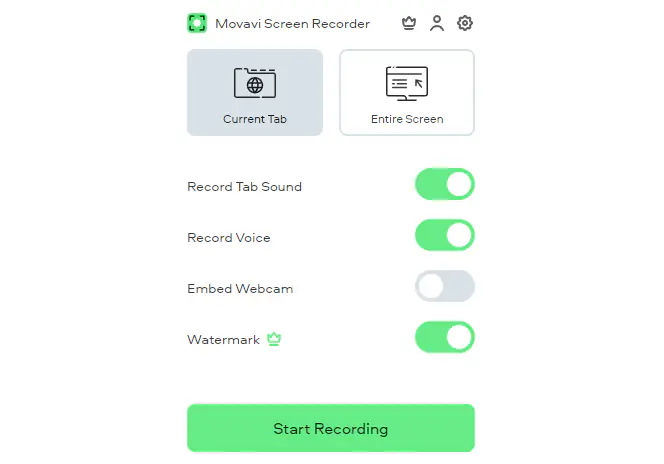
The following is a list of the most important aspects to consider when choosing a tool for screen recording on a Mac with audio:

Features: Choosing the right software for recording your screen depends on what you aim to achieve with your recordings. For example, if you plan on recording what occurs on your screen, any screen capture software is likely to suffice. If you need editing or streaming tools, take those features into account as you select your program.

Ease of use: Some apps are easy to use, while others are more complicated and require learning. Pick a screen recorder according to your level of experience.

OS: You should select a screen recorder compatible with the operating system you will use (Windows, Mac, etc.).

Reviews: Read user reviews and articles of professional blogs or magazines to learn how well the program performs before buying it.

Customer support: To quickly deal with probable software issues during the recording, look for a program that provides easy access to customer support.

Conclusion

There’s a great variety of screen-recording tools available today. Pick the option that has all the features you need and is compatible with your device. We hope this article has been helpful in making a choice.

Frequently asked questions

Why doesn't my screen recording have sound on a Mac?

There are many possible reasons for this. Usually, it's because the screen recording tool or software you're using to capture the screen isn't able to record system sounds or hasn't been configured correctly.

How do I record my screen with audio?

To record your screen with audio, use Movavi Screen Recorder.

  1. Download and run the app.
    Download Movavi Screen Recorder for Windows
    Download Movavi Screen Recorder for Mac
  2. Click Screen recording and set the capture area.
  3. Activate system sound capture and microphone recording if needed.
  4. Start the recording and hit Stop to finish the screen capture.
  5. Click Export, set the output parameters, and click Save.

How can I record my screen with audio on a QuickTime player?

  1. Download and set up the SoundFlower extension.
  2. Configure Soundflower to reroute your system audio to QuickTime.
  3. Open QuickTime and configure the settings accordingly.
  4. Press New Screen Recording and then the Record button to start recording.
  5. Press Stop when you're finished and save the recording to your device.

Have questions?

Have questions?

If you can’t find the answer to your question, please feel free to contact our Support Team.

Join for how-to guides, speсial offers, and app tips!